# Global Illumination
## Goals
- Understanding concepts, differences, and uses of Global Illumination (GI), Final Gather (FG), and Caustics, and their application, often for a more photorealistic scene.
________________________
## Indirect (Global) illumination
In reality, when a ray of light hits an opaque surface, it is **either absorbed or reflected (or a little of both) by the surface**. If the light ray is reflected, it reenters the environment and continues to bounce off reflected surfaces until it is absorbed by another surface. Bounced light rays are **indirect illumination**.
Perhaps **80 percent of the illumination** in an environment is contributed by indirect (global) illumination, and simulating its effect is critical to creating realistic rendering.
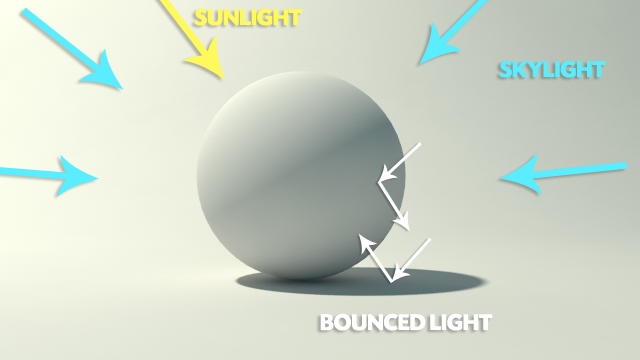
Image from [aversis.be/tutorials/vray/](http://www.aversis.be/tutorials/vray/vray-20-gi-methods.htm)
### Ambient occlusion
As light rays bounce around in an environment, fewer light rays reach the parts that are hidden in corners, cracks, and crevices. The lack of light in these areas creates a type of shadowing known as **ambient occlusion**.
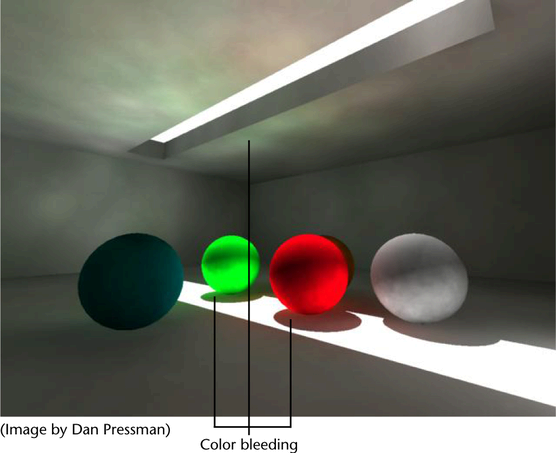
### Color bleeding
Color bleeding is a global illumination effect where reflected light projects some of the object’s diffusely (as opposed to specularly or glossily) reflected color onto a nearby surface.
For example, a bright red apple on a pure white table cloth ‘spills’ red onto the table cloth.
[Maya help: color bleed](http://help.autodesk.com/view/MAYAUL/2016/ENU/?guid=GUID-A9C09CAF-2594-472B-A01A-B06458915C73)
### Mental Ray
To use Global Illumination in Maya, you must use the Mental Ray renderer. **Mental Ray for Maya** offers all the features traditionally expected of **photorealistic rendering** and includes functionality not found in most rendering software. Mental Ray for Maya allows interactive and batch Mental Ray rendering from within the Maya user interface.
### Comparison between direct (local) and indirect (global) illumination

- Rendering with local illumination (with Raytracing). Areas that lie outside of the ceiling lamp's direct light lack definition. For example, the lamp's housing appears completely uniform. Without the ambient light added into the render, it would appear uniformly black.
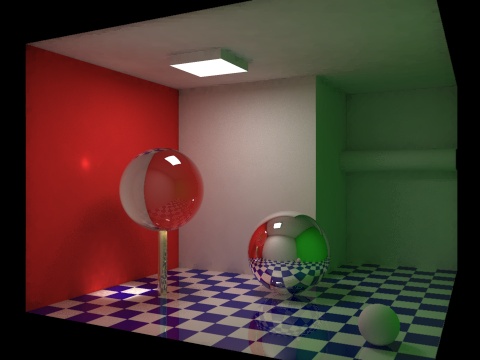
- Rendering with global illumination. Light is reflected by surfaces, and colored light transfers from one surface to another. Notice how color from the red wall and green wall (not visible) reflects onto other surfaces in the scene. Also notable is the caustic projected onto the red wall from light passing through the glass sphere.
The above examples are described in more detail here: [Global Illumination from wikipedia](http://en.wikipedia.org/wiki/Global_illumination)
--------------------------------------
## Cornell Box
**The Cornell box** is a test aimed at determining the accuracy of rendering software by comparing the rendered scene with an actual photograph of the same scene, and has become a commonly used 3D test model. [-wikipedia](http://en.wikipedia.org/wiki/Cornell_Box)

- [Link: Cornell box in many different variations.](http://graphics.ucsd.edu/~henrik/images/cbox.html)
- [Cornell Box Comparison](http://www.graphics.cornell.edu/online/box/compare.html)
- [Cornell Box Physical Model by Richard Rosenman](http://richardrosenman.com/portfolio-items/cornell-box-physical-model/)
### Different Cornell box render images:

## Glass & mirror ball

Three spheres II, M.C.Escher, lithograph, 1946.
### Homage to Three spheres II
- [link 1](http://www.butchgraphics.com/3d/3Spheres.html),
- [link 2](http://blenderartists.org/forum/showthread.php?216683-Modern-take-on-an-Escher-classic),
- [link 3](http://www.hdrlabs.com/cgi-bin/forum/YaBB.pl?num=1264525246).
_________________________________
## Global illumination, caustics, and final gather in Maya
Global illumination is often assumed to encompass all of global illumination, caustics and final gather. However, the definition of global illumination is different in Mental Ray for Maya. **In Mental Ray for Maya, global illumination, caustics and final gather are three separate techniques.** Global illumination simulates diffuse light bouncing multiple times over an area until it is completely absorbed.
Global illumination, caustics, and final gather all contribute to indirect illumination. When global illumination or caustics are incorporated in your scene, the Mental Ray for Maya renderer uses **photons** to simulate light inter-reflection and caustic effects. When final gather is incorporated in your scene, however, Mental Ray for Maya does not use photons but instead **samples** the semi-hemispherical area above every point in the scene to calculate the direct and indirect illumination. Since photons are not used for final gather, final gather requires the least rendering time out of the three options.
### Final Gather
Final Gather employs a specialized variation of raytracing in which each camera eye ray intersection creates sets of Final Gather rays. The Final Gather rays are sent out in a random direction within a hemisphere. The end result is a render that is able to include bounced light and **color bleed**.

You can find more details from the [Autodesk Knowledge Network.](https://knowledge.autodesk.com/support/maya/learn-explore/caas/CloudHelp/cloudhelp/2016/ENU/Maya/files/GUID-6A540E28-CBE6-405D-8627-0E2E8E2F2F61-htm.html)
### Using global illumination with final gather
Use final gather to add fine details to your scene. When global illumination is used, photons usually miss cracks and crevices in objects and therefore these areas may appear artificially dark. Final gather adds details by adding light to the scene; brightening and softening it and making the final render more realistic.
If details are washed out by global illumination because your scene is too bright, use ambient occlusion to add detail to your scene by subtracting light.
_____________________________
>### Final Gather vs. Global Illumination
>This explanation is drawn from [blog.digitaltutors](http://blog.digitaltutors.com/indirect-illumination-final-gather-vs-global-illumination/)
>
Global Illumination (GI) and Final Gather (FG) are the key algorithms to simulating realistic indirect illumination. Without these two techniques the lighting in CG environments looks unrealistic and extremely flat.
>
Despite the fact that both methods are there to achieve relatively the same goal, there are actually differences between the two and may be times when you would want to use one over the other.
>
>#### The Benefits of GI
>
Global illumination can work in different ways depending on your rendering engine. In Mental Ray it works by **the use of photons cast out into the scene**.
>
Global illumination gives you a lot of control over your scene and creates results very close to what you would see in the real world. It’s great to use when you have physical lights in your scene like a light bulb, torch, etc. It’s vital for architectural lighting because it produces very natural results and GI allows the light to inter-reflect between different surfaces.
>
>#### The Benefits of FG
>
Final gather works a little differently than Global Illumination in that it uses **rays to sample the scene instead of photons**. It casts these rays out based on the camera view rather than from the light sources. You can think of it as the faked method for simulating indirect illumination. However, faked doesn’t always mean bad.
>
**Final gather is extremely fast** to set up, and while it doesn’t give you the control of casting the rays from a particular light source, it makes up for it **with ease of use**.
>
If you’re using an **image-based light setup** for your scene then Final Gather is a must because without Final Gather the image-based light won’t be calculated in the scene.
>
Another benefit to using FG is that you actually don’t even need a light source in your scene. **Final Gather will simulate indirect illumination based on the colors and materials in the scene**.
>
>#### The Downsides to GI
>
The biggest downside to GI is **simply render time**.
>
GI also requires more **fine tuning and tweaking** to get the results you want. You may notice if you begin to emit photons from a light source in your scene it probably doesn’t produce the results you want, and the rendered scene will likely be dark and splotchy. These splotches are actually the photons that are cast out into the scene. To reduce the splotches you need to increase the amount of photons, which means increasing the render time as well.
>

Dark and splotchy render image.
>
>### The Downsides to FG
>
In Final Gather, by default, the rays only bounce once in the scene, whereas with GI the photons bounce multiple times giving you more realistic results. You can increase the number of bounces in the FG settings, but increasing this number means increasing the render time significantly.
### Caustics
Global illumination simulates light reflected from diffuse surfaces. Caustics simulate light reflected from glossy and reflective surfaces as well as light that passes through refractive transparent materials. Caustics are calculated completely independently from global illumination; however, the workflow is very similar.

#### Using global illumination with caustics
Global illumination is not used for the focusing of light (that is, reflection and refraction). It is generally used with diffuse materials or for simple transparency. If you need to add refractions, then incorporate caustics in your scene.
_________________________
### Maya help documents (Autodesk knowledge center)
- [Global illumination, caustics, and final gather in Maya](http://help.autodesk.com/view/MAYAUL/2016/ENU/?guid=GUID-6FBC6DDF-D727-4A4C-ABD7-3A94E4D70461)
- [Render with Global Illumination](http://help.autodesk.com/view/MAYAUL/2016/ENU/?guid=GUID-143A087B-FB09-4554-B53F-2A5C476D4406)
- [Render with Final Gather](https://knowledge.autodesk.com/support/maya/learn-explore/caas/CloudHelp/cloudhelp/2016/ENU/Maya/files/GUID-683F30E9-B158-4AEE-8D1D-87369D6F1186-htm.html)
- [Final Gather](https://knowledge.autodesk.com/support/maya/learn-explore/caas/CloudHelp/cloudhelp/2016/ENU/Maya/files/GUID-6A540E28-CBE6-405D-8627-0E2E8E2F2F61-htm.html)
- [Photon tracing, Conditions for photon storage](http://help.autodesk.com/view/MAYAUL/2016/ENU/?guid=GUID-2A05BF61-2A60-4CE8-8F54-43E362C06982)
- [Mental Ray 2016 Render Settings: Legacy Mental Ray tabs](http://help.autodesk.com/view/MAYAUL/2016/ENU/?guid=GUID-67B3D408-76A5-43FA-BC4B-1E1F2243C1F6)
__________________________
______________________________
# Applying global illumination in Maya
## Creating photons
To use Global Illumination or Caustics, you must employ **virtual [photons](http://en.wikipedia.org/wiki/Photon)**. In Maya, **spot, point, area,** and **directional** lights generate photons when the **light's *Emit Photons* attribute** is selected.
When a scene is rendered, photons are traced from each photon-emitting light to surfaces in the scene. If a photon “hits” a surface, that photon is absorbed, reflected, and/or transmitted (refracted) based on the qualities of the material assigned to the surface. If a photon is reflected or transmitted, it survives with only a portion of its original energy.
> The amount of energy is determined by the attributes that establish the surface's **diffuse color, reflection coefficient**, and **various specular highlight qualities.**
## In the light attribute editor

### Light's Global Illum Photons attribute
You can lower or raise the default value of 10,000 to decrease or increase quality.
### Light's Caustic And Global Illumination subsection
- **Photon Color** represents the red, green, and blue components of a photon's energy.
The RGB values of its color swatch are multiplied by the Photon Intensity attribute to produce Energy R, Energy G, and Energy B attributes.
- **Photon Intensity** is a scaling factor used to determine the intensity of photons produced by a light. A value of 0 will turn off photon tracing for the light.
- **Exponent** simulates light falloff over distance. The default value of 2 replicates natural, quadratic decay. A value of 1 effectively prevents falloff from occurring. Values higher than 2 create a more rapid falloff by artificially decreasing photon energy with distance.
## In the Render setting window
### Max Trace Depth
If a photon survives a hit and is reflected or transmitted, it continues through the scene until it hits another surface. Once again, the photon is absorbed, reflected, or transmitted. This process continues until the surviving photons are stopped by the **Max Trace Depth attribute**, which defines the number of hits permitted per photon. (Max Trace Depth is located in the **Render Settings window // Mental Ray / Quality /Trace Depth**)

- **Reflection** defines the maximum number of times a photon will reflect in a scene. This attribute is overridden by the Max Trace Depth attribute. The first surface encountered is not included in the count.
### Photon map
The photons that are absorbed by a surface (and are thereby culled in a process known as *Russian Roulette*), have their position, incident direction, and energy stored in a special photon map.
To save a photon map, type a name for the map in the **Photon Map File** field (found in the Photon Map section on the Indirect Lighting tab of the Render Settings window) and create a render (do not add a file extension to the name). When you want to reuse the same map, deselect Rebuild Photon Map. The map is stored in the renderData\mentalray\photonMap directory with the .pmap extension. When you want to overwrite the map, simply select Rebuild Photon Map. Reusing a photon map can speed up rendering.
The map Visualizer allows you to see how the photons are cast in the scene.

The above image shows Maya 2014. In Maya 2016, you can find the same attribute at the **Quality/Legacy Options/Photon Map.**
(If the **Legacy Options** attribute tab is not visible, check the **'show advanced settings'** options box at the top of Quality tab to show it.)
### The Global Illumination attributes in the Render Settings window.

Maya 2016.
- **Radius** controls the maximum distance from a surface point that the renderer will seek out photon hits to determine the color of the point in question. If photons hits are within the search region, their energies are averaged. The search regions render as colored discs when the Radius is inappropriately small for a scene or there are an insufficient number of photons present. The default value of 0 allows Maya to automatically pick a Radius based on the scene size.
- **Accuracy** sets the maximum number of neighboring photon hits included in the color estimate of a single rendered point. The search for neighboring photon hits is limited to the region established by the Radius attribute. In general, the higher the Accuracy value, the smoother the result. However, Accuracy affects only photon hits that are in close proximity. That is, if the photon count is low or the Radius value is small so that the photon hits are not discovered in the search region, the Accuracy attribute will have no effect on the render.
- **Scale** serves as a multiplier for the Photon Intensity attribute of all lights in the scene. If the slider is set to 50 percent gray, all the photons in the scene will be at half intensity.
- **Merge Distance** specifies a distance in world space within which overlapping photons are merged. The option is used to reduce the size of photon maps and decrease render times. You should raise this setting by very small increments, as it can also introduce blotchiness in the render.
__________
## Reference
[Maya 2016 online Help](http://help.autodesk.com/view/MAYAUL/2016/ENU//)
- Art of Maya [pdf link](http://web.cse.ohio-state.edu/~parent/classes/682/MAYA/art_of_maya.pdf)
_______________
# Review
## Assignment
- [Lab 1](http://2016datt2500.tumblr.com)
- [Lab 2](http://2016datt2500lab2.tumblr.com/)
- [Lab 3](http://2016datt2500lab3.tumblr.com/)
- [Lab 4]((http://2016datt2500lab4.tumblr.com/)
-----------------
# Lab
## To do list
- Lab practice A: Glass and mirror balls in the Cornell box
- Lab practice B: Global Illumination
- Lab practice C: Global Illumination and Final Gathering
-----------------------
## Practice A: Glass and mirror balls in the Cornell box

### Glass material

### Creating a Cornell box
1. Make a box for a room and a camera
2. Apply materials to the faces of the box respectively (especially at the side walls, apply strong contrasted color such as red/blue, red/green, orange/green or such.
3. Create basic objects (including two spheres)
### Download
- [Cornell box mb file](gl_cornell01.mb)
### Glass & mirror materials
1. **Research references** such as photographs of physical glass.
[Example of a glass material reference](http://www.thisiscolossal.com/2012/08/a-glass-sphere-solar-energy-generator-capable-of-converting-sun-and-moonlight-into-usable-power/)
2. In the **Hypershade editor**:
assign **Blinn** shader. Then open & change its attributes as follows:
- Color: black
- Transparency: Value 0.9
- Specular: Eccentricity 0.05, Specular Roll off 1.5, Color white, Reflectivity 0.2
- Raytracing: check Refractions, Refractive Index 1.33, Refraction Limit more than 2

* **Refractive Index:** in optics, the refractive index or index of refraction of a substance (optical medium) is a dimensionless number that describes how light, or any other radiation, propagates through that medium. For example, the refractive index of water is 1.33, meaning that light travels 1.33 times slower in water than it does in vacuum. [Wikipedia](http://en.wikipedia.org/wiki/Refractive_index)
3. Render Settings: turn on the Raytracing attribute
### Review: Camera Settings / Camera Attribute Editor / Render setting
Make a close-up camera

Lighting & Soft Shadow

---------------------------------------------------------------
## Practice B: Global Illumination

1. Make sure at least one light source in your scene emits photons.
2. You can turn on Global Illumination from the **Render Settings/Mental ray/Quality tab. You can either choose **Advanced Light Sampling / Indirect Diffuse (Gl) Mode** or **Legacy Options/Global Illumination.**
>If the default settings are not sufficient to achieve the look you want (or to reduce render speed), tweak the global illumination settings until you achieve the look you want.
- Please check **how to create photons** from the lecture notes.
___________________________
## Practice C: Global Illumination, Final Gathering, and Caustics
After you load the Mental Ray plug-in (and select Mental Ray as the renderer), the Render menu lists available menu items for Mental Ray for Maya. As well, the Attribute Editor contains a Mental Ray section in which you can edit attributes that are used exclusively when rendering with Mental Ray for Maya.
### Prepare the scene in the correct project directory.
- Let's use the Cornell box and its area light setup.
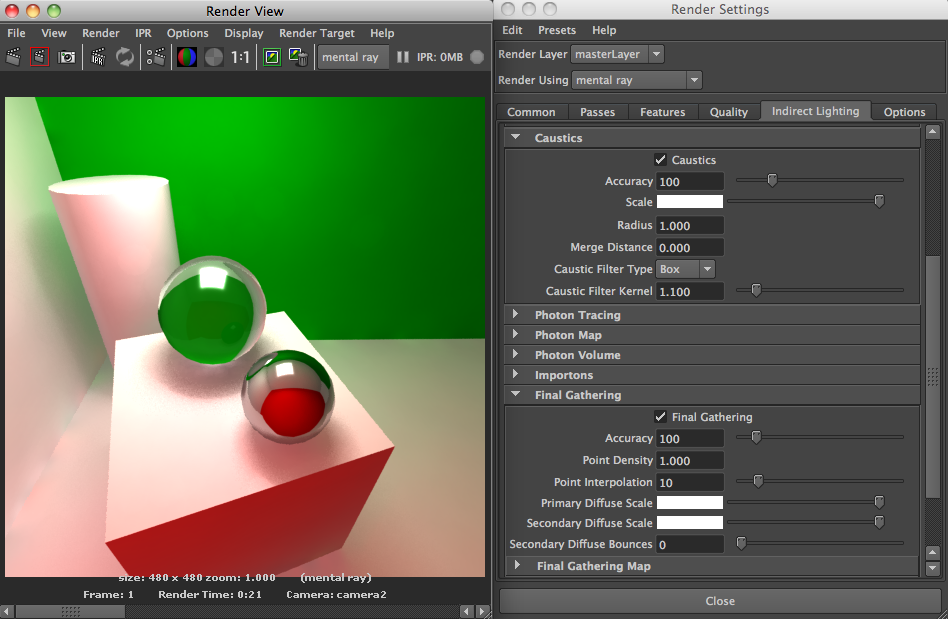
### Render Settings window
- Choose Mental Ray renderer.
- In the **Global Illumination** section, select the Global Illumination check box.
- In the **Final Gathering** section, temporarily deselect Final Gathering: temporarily disabling Final Gathering will speed up the render as you adjust the various Global Illumination settings.
### the Attribute Editor tab for the area light
- In the **Caustic And Global Illumination** section, select **Emit Photons**. Render a test. Each dot represents a photon hit.
- The dot indicates the area of influence the photon has when combining the photon's indirect illumination information with the direct illumination calculation.
- The dots are colored, indicating that their energy has been influenced by a surface they have bounced off. For example, the red dots indicate a bounce off a nearby red wall. Hence, a major advantage of Global Illumination is the ability to produce **color bleed**. Although Final Gathering is also used to produce bleed, it is generally more subtle.
- Adjust the **Radius** attribute, found in the Global Illumination section of the Render Settings window. By default, Radius is set to 0, which means that Maya automatically selects a Radius value based on the scene size.
- It's important to adjust **the total number of photons** in the scene at the same time. To do so, adjust the Global Illum Photons value in the Caustic And Global Illumination section of the light's Attribute Editor tab. When raising the Global Illum Photons value, do so incrementally. The more photons that are being traced, the longer the render will take.
- Reactivate **Final Gathering** by selecting the Final Gathering check box. Final Gathering provides additional smoothing to the Global Illumination indirect illumination and helps hide unblended photon hits.

- If you have a refractive object, try to make a Caustic effect.
________________________
## Lab work to do
- Review & practice based on today's lecture & lab class material.
- Let's prepare project 2 & 3
- Project 2: the completion of project 1
- Project 3: free theme modeling & rendering.
- [Project link](project.html)
____________________________
## Assignment
- By **Monday Nov 28th** midnight, please complete your two assignments and upload the **rendering images** to the class Tumblr with simple descriptions: **"a11 by your name, date"**.
- A Cornell box with raytracing describing a glass and a mirror surfaces.
- A Cornell box with GL photons. FG is optional.
## Attendance
- Next week, we will check your attendances so, if you skip the class with a proper reason, don't forget to submit related documentation to Haru or Yifat such as a doctor's note.
-------------------------------------
## Office hour
Haru Ji's shared office location: 229 Goldfarb Centre for Fine Arts
Hours: Tue - 1:30 to 4:30
__________________________________