# Rendering for composition
Rendering is the final step of the 3D animation pipeline and its quality is crucial to the strong completion of your project.
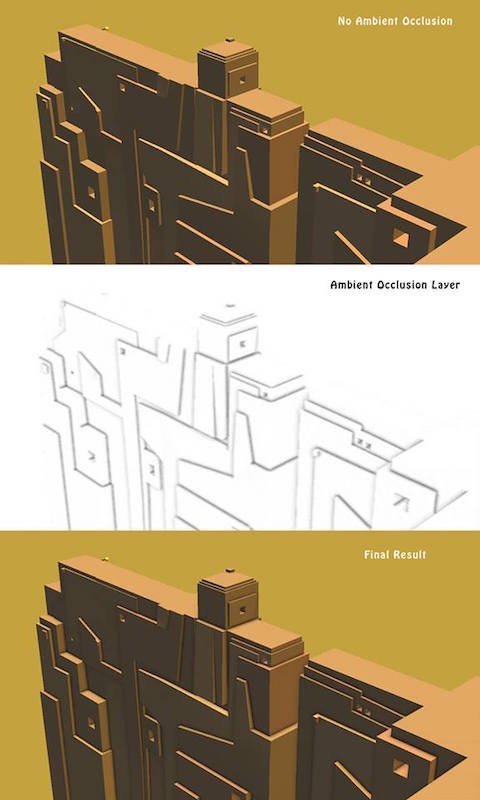
## Ambient Occlusion
**Ambient occlusion** refers to the attenuation of indirect or diffuse light on an object. It refers to the darker areas of the object such as in creases, cracks, and crevices. Ambient occlusion is caused by indirect light's inability to bounce around and illuminate areas that are blocked by nearby features, that instead absorb the light rays. **These subtle variations in lighting are visual clues for our eyes to detect surface details and distinctions** that would otherwise be washed out and unnoticeable. Ambient occlusion adds realism to your scene by adding shadows in crevices, nooks and crannies, and so on. For each surface point, it calculates how much light is blocked by other geometry.
In the example below, the ice blocks stand out because of the shadowing between them. The cracks between the ice bricks appear darker because the light is blocked by the ice bricks' local geometry.

Applying normal map, © CC BY-SA 3.0
When ambient light is used, objects in your scene may appear to be too bright and geometric detail may become lost. Ambient occlusion solves this problem by subtracting ambient light and thus adding shadowing.


-----------------
## Baking a texture
### Batch rendering
A batch file is a set of commands given to the computer to do, one after another. Using batch files, you can queue several rendering tasks at the same time, so that once one is finished, the next begins. Batch rendering often occurs as a different thread or process, as if it were a different program running in the background, so Maya allows you to keep working while the batch is rendering.
### Related tutorials
- [How to bake ambient occlusion.](https://www.youtube.com/watch?v=n65LBCncCG4)
- [Ambient Occlusion render pass.](https://www.youtube.com/watch?v=hFOTDEjVDmE)
### Test image

Image by Haru Ji.
______________________
## Creating textures with the Transfer Maps tool
Reference: Advanced Maya® Texturing and Lighting, Second Edition by Lee Lanier, 2008
The Transfer Maps tool can create normal maps and displacement maps by **comparing surfaces**. In addition, the tool can bake lighting and texturing information.
### Normal map

### Displacement map

### Baking lighting and shading information
You can "bake" lighting, texturing, and shadow information with the Transfer Maps tool. In this situation, a textured source creates a color bitmap for a target surface. The Transfer Maps tool provides several attributes to choose from for this operation: Diffuse Color Map, Lit And Shaded Color Map, and Alpha Map.

### Transfer Map window editor


Baked normal map
-------------------------------------------------
## Creating textures for composition
, 
Initial skin map for the color map & ambient / bump map
, 
Color map & specular map.

Texturing on the high-res Toad geometry. All images by Haru Ji.
### Applying baked maps to a lower resolution surface.

Texturing on the low-res Toad geometry.
-------------------------------------------------
## Final gathering rendering
#### Comparison of high and low res modelings (with final gathering).


You can test your scene:
- Click **physical sun and sky** in the Scene tab in the Mental ray render setting.
- Check **emit environment light.**

Rendering regions to check out parameter values.
- Tweak parameters of attributes including ground color from **mia_physicalsky1** node.
All images by Haru Ji.
_________________________
## Depth of Field
Reference: Advanced Maya® Texturing and Lighting, Second Edition by Lee Lanier, 2008
Depth of field is the range of distances that encompass objects that appear acceptably sharp. Due to the optical nature of real-world lenses and the physical qualities of the atmosphere, photography and videography rarely produce images that are 100 percent in focus. In contrast, 3D renders are always in perfect focus unless artificial depth of field is used.
You can activate Maya's depth of field by checking the Depth Of Field attribute in the Depth Of Field section of the camera's Attribute Editor tab.

[View the depth of field effect in Viewport 2.0](http://help.autodesk.com/view/MAYAUL/2016/ENU/?guid=GUID-93DFCF2E-1B24-4C4C-89FD-4C4C202746ED)

The F Stop attribute roughly approximates the f-stop of real-world cameras. F-stop is a number that represents the ratio between the diameter of the lens aperture and the focal length of the lens. F-stops are scaled by an approximate factor of 1.4 (for example, f/1.4, f/2, f/2.8, and so on). Each increased f-stop halves the open area of the aperture, halves the amount of light striking the film, and increases the depth of field. The f-stop isn't the only factor to influence depth of field, however. Depth of field is inversely proportional to the focal length of the lens and directly proportional to the distance from the camera to the subject.

The Distance tool used to determine the focus distance.

An artificial depth of field is constructed by masking multiple copies of a render and applying different strength Gaussian blurs.
______________________
## Advanced topic: render layers and passes
There are many techniques to create better quality rendering. In particular, you can save time and energy and control your rendering result in detail by splitting up renders based on objects or shading components. You can even separate shadows from the rest of the scene or temporarily assign objects to specialized materials through the Render Layer Editor.
When a shot is animated in a 3D program for a professional production, it is rarely rendered out as is. Instead, the shot is divided into layers and/or render passes. In Maya, the Render Layer Editor allows you to create and manage various render layers and render passes.
### Render layer editor
Render layers can be used to separate the elements of a single scene into different versions or into different layers of a composite. Each layer can have its own shaders, lights, and settings. Using overrides, you can change the way each layer renders.
You can create and manage render layers using the Layer Editor in Render mode (called the Render Layer Editor). With render layers, you can assign any object to multiple layers with a different material on each layer. This lets you create multiple images for each frame, from any combination of Maya's four renderers, third party plug-in renderers, and post-processes such as Fur and Paint Effects.
**A system of per layer and per object overrides** means that objects can have different shading and rendering attributes on different layers.
With **render layers**, you can assign any object to multiple layers with a different material on each layer. This lets you create multiple images for each frame, from any combination of Maya's four renderers, third party plug-in renderers, and post- processes such as Fur and Paint Effects. Rendered images can be efficiently organized for output to a compositor. Render layers can be also be rendered to Adobe® Photoshop® (PSD) format, which supports multiple image layers.
, 
,
Final realistic render image:

Another powerful tool to use in conjunction with this is the ability to hide objects from the renderer. This lets you use very high-quality settings for only some parts of the image.

(Upper left) Diffuse layer render. (Upper right) Shadow layer render. (Middle left) Specular layer render. (Middle right) Blended layers result. (Bottom) Render Layer Editor. Diffuse layer Blending Mode is set to Normal. Shadow layer Blending mode is set to Multiply. Specular layer Blending Mode is set to Screen.
### Z-depth map

(Clockwise, from upper left) Master render layer, Luminance Depth preset, Geometry Matte preset, and Shadow preset.
Images from Advanced Maya® Texturing and Lighting, Second Edition by Lee Lanier, 2008
Using Z-depth maps, you can recomposite the image back together. You can use it to fake the depth of field by blurring some parts of the image and not others; render bubbles drifting in a scene; or render an object with motion blur moving behind glass – the transparency makes motion blur effects take a long time, but if you render the glass on a different layer that problem is solved. Many special effects such as particles are also more efficient to render separately. Computer-generated effects are incorporated into live footage using layers.

It shows overlapping of two render layers.
### Render passes
Render passes allow you to separate material properties into different images. These passes are derived from calculations stored in the frame buffer. Each pass can be used in compositing software to rebuild the rendered scene efficiently. Render pass contribution maps define which objects and lights are included in a render pass.
### Related references
- [Render layer overview](http://help.autodesk.com/view/MAYAUL/2016/ENU/?guid=GUID-BADD9FC7-C463-4D8B-AC69-36BDEF6EBCCE)
- [Render layers example: automotive preview](http://help.autodesk.com/view/MAYAUL/2016/ENU//?guid=GUID-6F235D42-CE2F-4E13-9592-A86C4FA5A0D2)
- [Working with render layers: different layer examples](http://help.autodesk.com/view/MAYAUL/2016/ENU/?guid=GUID-6AB13266-3C59-4CA2-BAF2-DA60F912A340)
- [Using render layers with your re-combination](http://help.autodesk.com/view/MAYAUL/2016/ENU//?guid=GUID-D883390E-8293-439E-9DC4-A0DF4A28977F)
- [Render Passes in Maya 2016](http://www.cgmeetup.net/home/render-passes-in-maya-2016/)
- [Introduction to multi-render passes: a simple workflow example](http://help.autodesk.com/view/MAYAUL/2016/ENU//?guid=GUID-8F8347C8-7BCE-488E-A9C9-8FBBAB4CE050)
- [Appendix B: Work with render passes](http://help.autodesk.com/view/MAYAUL/2016/ENU//?guid=GUID-FA411DD5-E54D-45EB-ADAD-BD638342FC6C)
- [Maya tutorial: Setting up render passes | lynda.com](https://www.youtube.com/watch?v=LdUpTK94G4M)
__________
## Reference
[Maya 2016 online Help](http://help.autodesk.com/view/MAYAUL/2016/ENU//)
- Art of Maya [pdf link](http://web.cse.ohio-state.edu/~parent/classes/682/MAYA/art_of_maya.pdf)
## Inspiration
- 3D animated short films for your inspiration:
- [link 1](http://webneel.com/25-best-and-award-winning-3d-animated-short-films-your-inspiration)
- [link 2](https://www.shortoftheweek.com/channels/3d-animation/)
_____________
## Review
### Assignment
- [Lab 1](http://2016datt2500.tumblr.com)
- [Lab 2](http://2016datt2500lab2.tumblr.com/)
- [Lab 3](http://2016datt2500lab3.tumblr.com/)
- [Lab 4]((http://2016datt2500lab4.tumblr.com/)
-----------------
# Lab
## To do list
- Lab practice A: Using Batch Bake to bake an ambient occlusion texture
- Lab practice B: Creating a normal map and an ambient occlusion map using the Transfer maps editor from high to low res models
- Lab practice B_a: Creating texture with your the occlusion map using Photoshop
- Lab practice C: Final gather
-----------------------
## Ambient Occlusion shading
There are several ways to apply ambient occlusion.
You can download the toad object files from here: [toad high resolution](obj/toad.obj), [toad low resolution](obj/toad_low.obj)
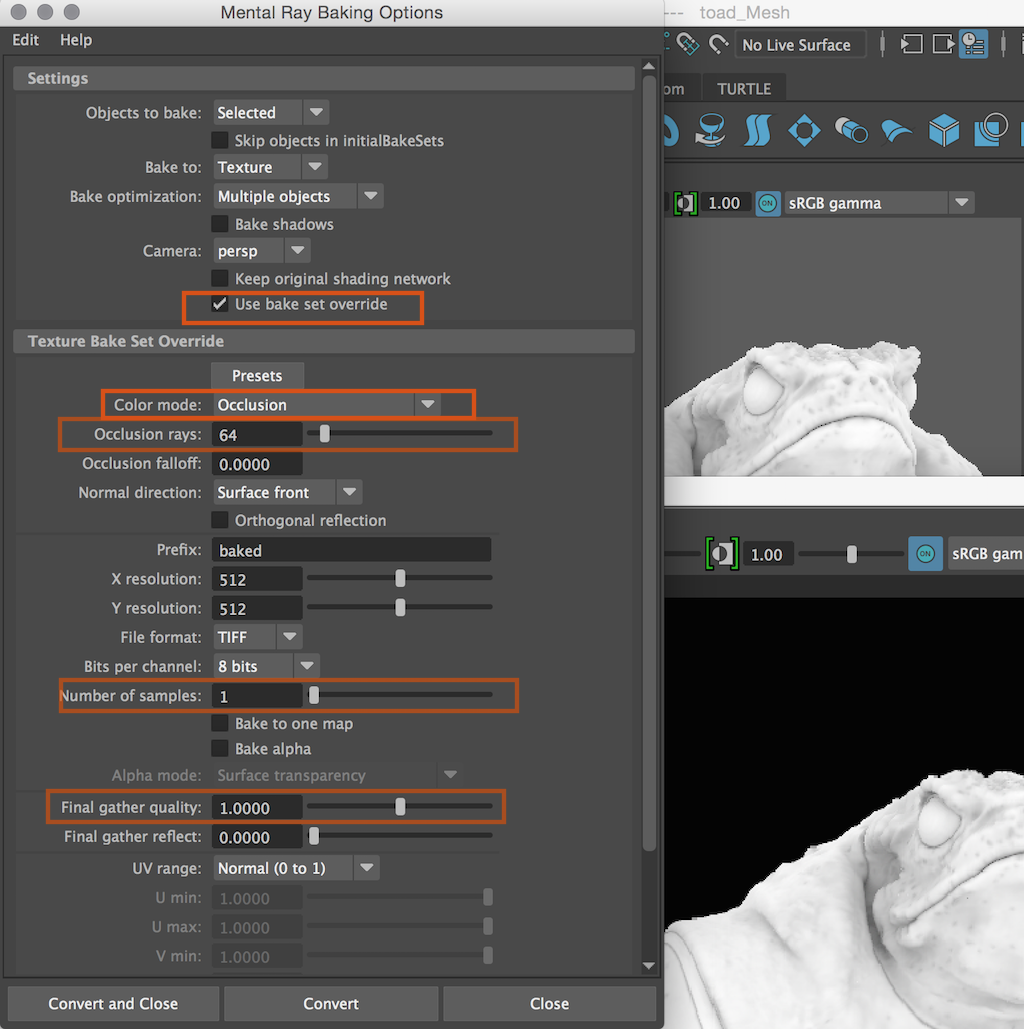
## Lab practice A: Using Batch Bake to bake an ambient occlusion texture
Let's create ambient occlusion map by using Batch Bake (mental ray).
Where: Rendering // Lighting/Shading / Batch Bake (Mental ray)

Ambient occlusion surface shading.
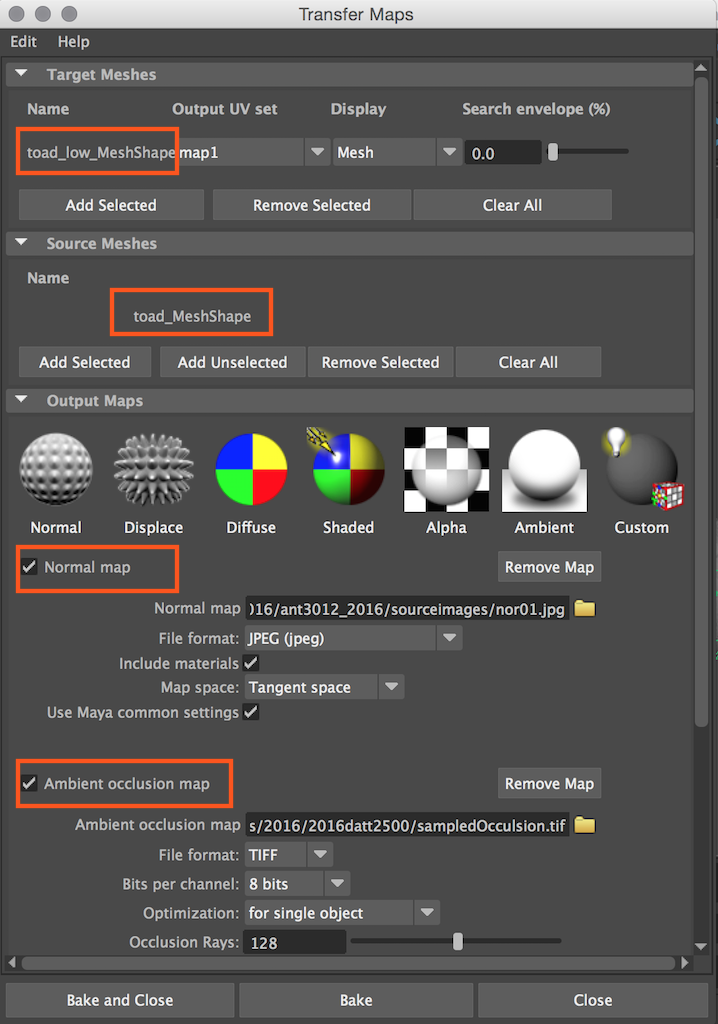
## Lab practice B: Creating a normal map and an ambient occlusion map using the Transfer maps editor from high to low res models
Please check out: Maya help [Create texture maps with the Transfer Maps editor](http://help.autodesk.com/view/MAYAUL/2016/ENU/?guid=GUID-B011A4BC-1B7A-4EC3-9B73-BCF744886C84)
Where to create your normal map:
Command: Rendering // Lighting/Shading / Transfer Maps...
## Lab practice B_a: Creating texture with your the occlusion map using Photoshop
- Once the bake is completed open the project file that you specified earlier.
- In that folder, select RenderData > MentalRay > lightmap > select your baked texture file and open this with Photoshop.
- Drag the Occlusion bake on top of your model's texture layer(s) and select Multiply as the layer blending mode. You may also want to apply a slight Gaussian blur to your occlusion layer, especially if it being used on an organic surface. For hard sharp edged surfaces like this one no blur was applied.
## Lab practice C: Final gather
1. Turn off Maya default lights from the Render Setting/Common/Render Option. If you have any light sources in the scene, turn off their *Illuminates by Default* attribute.
2. You can turn on Final Gather from the **Render Settings/Mental ray/Quality tab**. You can either choose **Advanced Light Sampling / Indirect Diffuse (Gl) Mode** or **Legacy Options/Final Gathering.**
>Change any of the following optional settings, which can have an effect:
>
- The camera background color: You can change background color or attach a environment texture to the image plane. You can also turn on the **Physical Sun and Sky** to simulate sun and shadow without adding any light in the scene. (from **Render Settings/Mental ray/Scene/Cameras/Environment)
- The object material’s colored Incandescence or Ambient color attributes.
- Irradiance contributions from shaders.
- Irradiance color mapping contributions from shaders.
- The number and location of lights in the scene.


Render image with no actual light but with turning on the 'Physical Sun and Sky' attribute from the Mental Ray render setting.


Render image using IBL. Image-based lighting (IBL) uses an image to create lighting in a scene. High dynamic range images (HDRIs) are usually the most effective sources for IBL.
### Related tutorial
- [MR Basic Final Gather using Image Based Lighting](http://wiki.bk.tudelft.nl/toi-pedia/MR_Basic_Final_Gather_using_Image_Based_Lighting_(IBL)
- [IBL Tutorial Maya - IMAGE BASED LIGHTING EASY SETUP](https://www.youtube.com/watch?v=AyWEKvIUImU&feature=youtu.be)
- [Maya tutorial: Setting up image-based lighting | lynda.com](https://www.youtube.com/watch?v=YXor6gDoVvc)
### High dynamic image
- [A light probe image by Paul Debevec and Dan Lemmon](http://ict.debevec.org/~debevec/Probes/)
You can find hdr files here to download.
------------------------------------------------------------------------
## Optional - Lab practice: Using a surface shader to bake an ambient occlusion texture in the Hypergraph
Related tutorial: [Ambient Occlusion in Maya - by Alchemist101 (2011).](http://www.game-artist.net/forums/spotlight-articles/1317-tutorial-ambient-occlusion-maya-alchemist101.html)
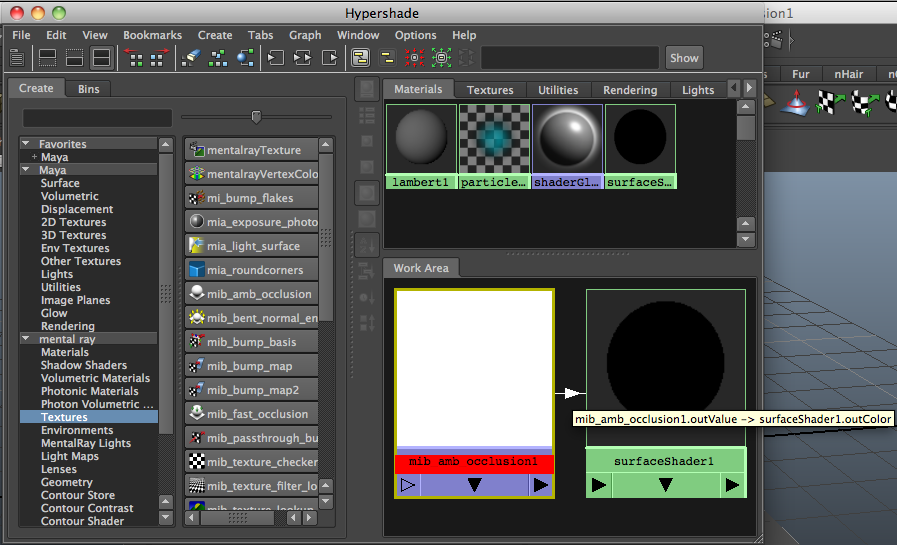
### Setting up the shader network
- First open the hypershade window and from the Maya nodes list MMB drag **a Surface Shader node** into the work area.

- Change it to MentalRay nodes, then under the textures tab MMB drag an '**mib\_amb\_occlusion**' node onto the work area.

- **Connect the 'OutValue' of the Occlusion node to the 'OutColor' of the surface shader**. This is the default connection between these 2 nodes so you can do this by simply holding down Ctrl and MMB dragging the occlusion node over the shader node.
### Setting up your scene
- In order to get good results from Ambient Occlusion the scene environment must be white. To do this open the Outliner window and select the Persp camera. In the attribute editor under the Environment tab slide the Background Color to 100% white.
- If you use the occlusion render pass, you don't need to change the Background color.

- Now open the Render Globals window and **select MentalRay** as your renderer and Production as the quality preset. Now change the multipixel filter to "Lanczos".

- Now close the render Globals window and assign the 'Surface Shader' you have setup to your model. It should turn the model completely black.
### Tweaking
- Frame your model and hit render. It can look grainy.
- Now we need to tweak the settings a little. Open the attribute editor of the Ambient Occlusion node.
- The **'Spread'** setting affects how far the occlusion shadow spreads over the surface.
- The **'Samples'** setting will remove the grainy look but will drastically increase render times.

________________________
## Lab work to do
- Review & practice based on today's lecture & lab class material.
- Let's work on project 2 & 3, if you have questions, you can bring them.
- Project 2: the completion of project 1
- Project 3: free theme modeling & rendering.
- [Project link](project.html)
## Assignment
- [Please fill in the final survey](https://goo.gl/forms/O52nkm5ty3YneYof1)
- By **Monday Dec 5th** midnight, please complete one assignment and upload the **rendering image** to the class Tumblr with simple descriptions: **"a12 by your name, date"**.
- Choose one geometry and create its low poly version and high poly version. Then create a Normal map and an Ambient occlusion map and attach them into the shader for the geometry you worked on. Then apply final gather rendering. Basically this is a sum of today's lab practices. If it is too difficult to create two versions of your polygon geometry, you can use toad geometries.
## Office hour
- Haru Ji's shard office location: 229 Goldfarb Centre for Fine Arts or 020 3D printing room.
- Hours: Tue - 1:30 to 4:30 & Wed - 1:30 to 3:30
__________________________________