# Polygon modeling
## Goal
- Understanding Polygon modeling.
- Being able to create polygon geometry and to modify its properties.
__________________________

Polygons are straight-sided shapes (3 or more sides), defined by three-dimensional points (vertices) and the straight lines that connect them (edges). The interior region of the polygon is called the face.
When many faces are connected together, they create a network of faces called a **polygon mesh** (also referred to as a polyset or a polygonal object).
## Differences between NURBS and polygon surfaces
The difference between NURBS surfaces and polygon objects is similar to the difference between vector images and pixel-based images in 2D drawing programs. NURBS surfaces are like vector images in that they are surfaces interpolated from resolution-independent curves. Polygon objects are similar to pixel-based images in that they are dependent on the number of polygon faces for their resolution.
### What is Polygon modeling?
- [digital-tutors video (1:51).](https://www.youtube.com/watch?v=lAf1HbnVESs)
### What is NURBS modeling?
- [digital-tutors video (1:43).](https://www.youtube.com/watch?v=m9U_XmnHQMU)
_____________
# Fundamentals
## Object vs. component mode
1. Object mode (transformation + shape + Input node)
2. Component mode (you can edit parts of an object)
## Polygon components
**Vertices, edges, and faces** are the basic components of polygons.
When you model with polygons, you usually use three-sided polygons called triangles or four-sided polygons called quadrilaterals (quads). Maya also supports the creation of polygons with more than four sides (n-gons), but they are not as commonly used for modeling.


## Normal
Normals are imaginary lines perpendicular to each point on a curve or surface (NURBS), or to the surface of a polygon (Polygon)
In Maya, normals are used to determine the orientation of a polygon face (face normals), or how the edges of faces will visually appear in relation to each other when shaded (vertex normals).
### What are Normals?
- [digital-tutors video (1:36).](https://www.youtube.com/watch?v=L3oCQEwtMLI)
- Face normal


- Vertex normal

You can modify the shading of individual polygons by manually editing the vertex normals associated with the polygon mesh. Since they are always perpendicular to the curve or surface, the way normal lines point toward or away from each other can reveal subtle curvature.
### Shading
Normals play a central role in shading. In the real world, two main factors determine the appearance of a surface: what an object is made of, and light.

- Online learning resource for computer graphics: [Normals, Vertex Normals and Facing Ratio](https://www.scratchapixel.com/lessons/3d-basic-rendering/introduction-to-shading/shading-normals) by Scratchapixel.
### Texturing
The below image shows how to do UV mapping and the use of place2DTexture node for the 2D texture placement.
- [Maya help: 2D placement](http://help.autodesk.com/view/MAYAUL/2018/ENU/?guid=GUID-94070C7E-C550-42FD-AFC9-FBE82B173B1D)

## Smoothing
- [Maya help: smoothing polygons](http://help.autodesk.com/view/MAYAUL/2018/ENU/?guid=GUID-8A5D0FF0-9BA1-435F-A4CA-53183311B819)

___________________________________
## Creating polygons: using primitives or creating from scratch.
- Using primitives (Create / Polygon Primitives)
- Creating Polygon from scratch (Mesh Tools / Create Polygon Tool)

Primitives in Maya
## Editing in component mode
- Transform vertices, edges, and faces
- Split faces using snap (Mesh Tools / Multi-Cut)
- Combine or separate meshes
- Merge vertices, edges, and faces
- Delete vertices, edges, and faces
- Append the deleted faces (Mesh Tools / Append to Polygon)
- Extrude faces or edges (Edit Mesh / Extrude)
----------------
# Invalid polygon geometry
Some types of polygon geometry will not work in Maya. Invalid geometry includes vertices that are not associated with a polygon edge and polygon edges that are not part of a face (dangling edges).
## Solution
- Converting polygon faces to triangles is a quick way to ensure non-planar faces render properly.
- Or converting polygon faces to quads is a good way to clean up polygons or reduce the number of faces.

## Two-manifold vs. non-manifold
- Polygonal geometry can have different configurations or topology types in Maya. Understanding the characteristics of these topologies can be helpful when you need to understand why a modeling operation failed to execute as expected.
- **Two-manifold topology polygons** have a configuration such that the polygon mesh can be split along its various edges and subsequently unfolded so that the mesh lays flat without overlapping pieces.
- **Non-manifold topology polygons** have a configuration that cannot be unfolded into a continuous flat piece. Some tools and actions in Maya cannot work properly with non-manifold geometry. For example, the legacy ***Boolean*** algorithm and the ***Reduce*** feature do not work with non-manifold polygon topology. The image below shows three examples of non-manifold topology polygons.

The following operations in Maya can produce non-manifold geometry:
- Select Faces or Edges and select Edit Mesh > **Extrude.**
- **Normals > Reverse** (without extracting geometry).
- Edit Mesh > **Merge** Components.
- **Delete** Face.
- Edit Mesh > Merge Components to Center
You can convert non-manifold topology polygons into two-manifold topology (including the less obvious case of adjacent faces with opposite normals) using the **Mesh > Cleanup** tool in Maya.
__________
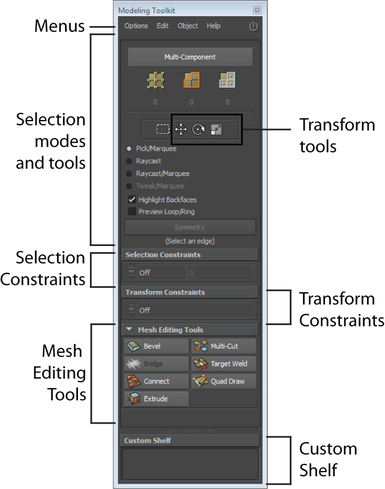
## Modeling Toolkit
Modeling Toolkit used to be a plug-in called NEX, that has been integrated within Maya since 2014. It integrates component-level selection and editing tools together (such as selecting vertices, edges, faces, etc., and extruding them, for example) for a more streamlined modeling workflow.

The location of Shortcut in the Maya GUI
__________
## Inspiration
- Low poly art:
[Timothy J. Reynolds](http://www.turnislefthome.com/),
[AWWWARDS](http://www.awwwards.com/low-poly-illustration-what-s-the-secret.html)
- Apple iPhone 3d diorama animation video [Youtube](https://www.youtube.com/watch?v=Em2WhCa8cgE)
- Paper City [Vimeo](https://vimeo.com/67658001)
- Modeling based on the still-life masterpiece painting by Pieter Claesz [link](http://commons.wikimedia.org/wiki/File:Pieter_Claesz_001.jpg): HOMAGE TO MASTER CLAESZ By artist KORNÉL RAVADITS.
## Reference
[Maya 2018 online Help](http://help.autodesk.com/view/MAYAUL/2018/ENU//)
- Art of Maya [pdf link](http://web.cse.ohio-state.edu/~parent/classes/682/MAYA/art_of_maya.pdf)
(Polygon modeling. p.48~49)
_______________
# Lab
## To do list
- Lab practice A: **exercising basic polygon editing**
- Lab practice B: Boolean operation
- Lab practice C: **your toy car**
- Lab practice D: beautiful condo
-------------------------------
## Lab practice A: exercising basic polygon editing
- Transform vertices, edges, and faces
- Split faces using snap (Mesh Tools / Multi-Cut)
- Merge vertices, edges, and faces
- Combine or separate meshes
- Delete vertices, edges, and faces
- Append the deleted faces (Mesh Tools / Append to Polygon)
- Extrude faces or edges (Edit Mesh / Extrude)
________________________
## Lab practice D: Boolean practice
- Polygons
1. Create more than 2 Polygon objects.
2. Choose model 1 and model 2.
3. Click the Boolean operation from the Modeling menu set -> Mesh / Booleans / select among 'Union, Difference, and Intersection'.
____________________________
## Lab practice C: your toy car

____________________________
## Lab practice D: beautiful tall building
Reference: Absolute World [Wikipedia](https://en.Wikipedia.org/wiki/Absolute_World), [designApplause](http://designapplause.com/news/people/mad-architects-studio-gang-win-chicagos-george-lucas-museum/42701/)


__________________________________
# Assignment
- Please upload screenshot images of your polygon models to Canvas. Submit one sketch, one perspective, and one four-view image for each model (6 images total):
1. A fun toy of your own design.
2. A beautiful condo of your own design.
________________________
# Action item
- Web tutorial: [Lynda.com: Maya 2018 essential training by George Maestri.](https://www.lynda.com/Maya-tutorials/Maya-2018-Essential-Training/604210-2.html?org=ocadu.ca)
- Create Polygonal Models 29m 23s
- Model Polygonal Meshes 42m 12s
- Refine Polygonal Meshes 21m 51s
- Reading: Art of Maya [pdf link](http://web.cse.ohio-state.edu/~parent/classes/682/MAYA/art_of_maya.pdf)
(Polygon modeling. p.48~49).
## Group formation
- Please complete the survey to make a group preferences:
- [survey link for INTM-2016-001 Mon](https://forms.gle/oib6uy8rmn2QsQo8A)
- [survey link for INTM-2016-002 Wed](https://forms.gle/YMo6N6AtD4zbmspt7)
- Consider [the mid-term project schedule.](https://docs.google.com/spreadsheets/d/1MYsRz5QS9Zssrr2_sYgd5tzey0Yd366F4_Xqz54vCNU/edit?usp=sharing)
________________________
# Mid-term still-life group project (30%)
Please reconstruct via 3D modeling, a chosen reference still life image (a painting or a photograph) with full scene construction. Apply proper shaders with textures and cinematographic set-up including camera, lights, and shadows. For this project, you will work as a group. It must be clear how each member contributed to the final work.
- **What to submit:**
1. Your final render image (at least 1K image).
2. Your final Maya scene. Please check the size before you submit. If it is over 20 mb, you need to create a link to download your project zip file. Don't forget to organize your objects in your Maya file: using layers and naming.
3. Two page documentation PDF file, showing a. your reference image, b. a description or an artist statement of your choice and focus, a description of challenges and how you solved problems in the process of making, and a role description of each member.
- **Where to submit:** via Canvas.
## General guidelines for the project
- Choose your theme carefully reflecting a good amount of the technical and aesthetic challenges [link to evaluation criteria from the class outline](index.html).
- Clean the file: proper naming, and delete the history once it is ready.
- Modeling details: Work on good proportion. Add bevels to smoothen edges. Apply smoothing if it is a smoothed and curved surface; if it is NURBS surface, increase the number of spans in the tessellation tab or rebuild, or if it is polygon, either do smooth or smooth proxy, or by manually adding more divisions or edges.
- Cinematography: redefine your camera set-up (film gate) and match it to the render setting (resolution gate). Check that your lighting shows good balance and overall contrast to help viewers to focus on the main objects, and to reveal important details in your scene. Don't forget to create good soft shadows.
- Shading & rendering: define and reveal proper material characteristics. When you do render, properly apply ray tracing, direct or indirect illumination only if it fits the need. Don't forget to apply anti-aliasing.