# Cinematography
## Goal
- Understand and be able to create and control lighting & shadows, camera(s), and to render final images with a good aesthetic sense and fine control of artist's intention and goals.
------------
# 1- , 2- , and 3-point lighting
Reference: Maya® Studio Projects Texturing and Lighting, Lee Lanier, Sybex, 2011
## 3-point lighting components

[Standard 3-point lighting applied to a mannequin, Image from Advanced Maya® Texturing and Lighting]
**Key light**
The most intense light in a scene. The key light's source is generally identifiable (the sun, a lamp, and so on). The key light usually produces the strongest shadow in the scene.
**Fill light**
A secondary light that is less intense than the key. This light "fills" in the dark areas of a subject and the shadows produced by the key. Fill lights often represent light from a key that has bounced off a surface, such as a wall.
**Rim/Back/Hair light**
An intense light source placed behind a subject that strikes the subject along the edge. Rim lights are commonly known as backlights or hair lights.

Image from Maya ® Professional Tips and Techniques.
## Using 3-points lighting
#### 1-Point Lighting
The 1-point lighting scheme is dramatic, sometimes stark, and often foreboding. The lighting involves a single, easily identifiable key light source, with no significant supplemental sources.
#### 2-Point Lighting
The 2-point lighting scheme matches many of the lighting scenarios we encounter in our everyday lives. The scheme often involves a strong key and an extremely diffuse fill.
#### 3-Point Lighting
The most commonly discussed and applied lighting technique is 3-point lighting.
In the standard 3-point lighting scheme, a strong key is placed to one side of a subject (approximately 15 to 45 degrees off the camera axis). A fill light is placed on the opposite side and is at least half the intensity of the key. A rim light is placed behind the subject so that it grazes the subject's edge.
#### 4-point Lighting
Four-point lighting simply adds a fourth light to illuminate the background or set behind the subject.
 Image from Toth Edina's Blog.
### More reference
- [Rembrandt](http://en.wikipedia.org/wiki/Rembrandt)
- [Caravaggio](http://en.wikipedia.org/wiki/Caravaggio)
- [MISE-EN-SCENE from College of Film & Media Studies Blog](http://collegefilmandmediastudies.com/mise-en-scene-2/)
- [Cinematographer Matthew Scott blog](http://mattscottvisuals.com/lighting/)
______________________________
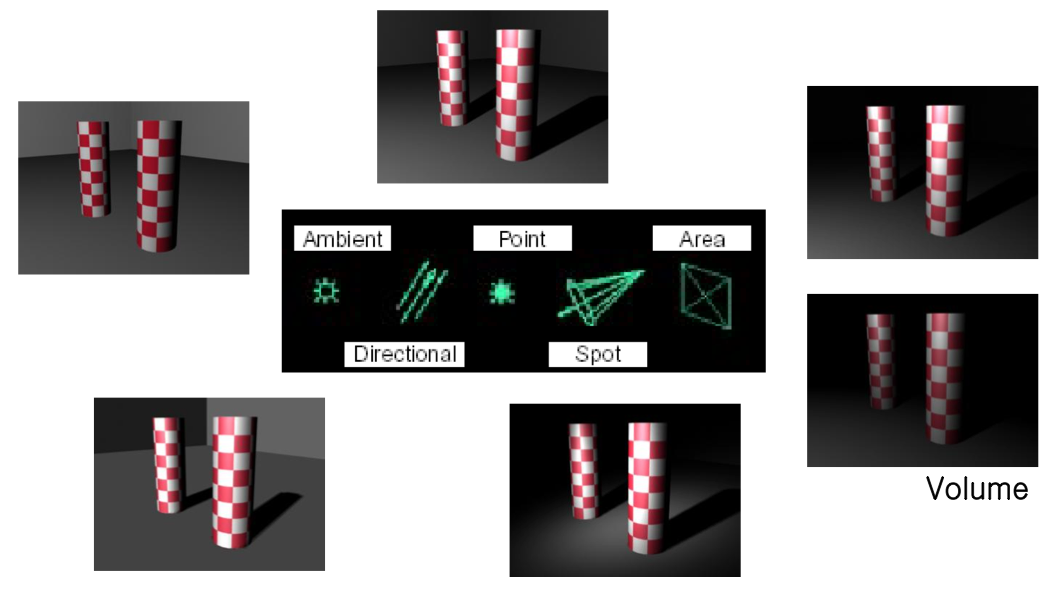
## Light sources in Maya
Maya has a number of light sources that let you achieve a wide variety of lighting effects.
By default, Maya scenes do not contain light sources. However, Maya’s default lighting helps you to visualize objects via Shaded display in the scene view (press 5). If you turn default lighting off and have no lights in the scene, the scene appears black (see Default lighting in Maya for more information). By controlling its intensity, color and direction, light becomes a key factor in creating a scene in Maya.
With Maya, you have much more control over the placement, intensity, and characteristics of lights than you do with real-world lights. Shadows, specular highlights, diffuse, and glow all contribute to how light affects a scene.

## Spot light attribute editor
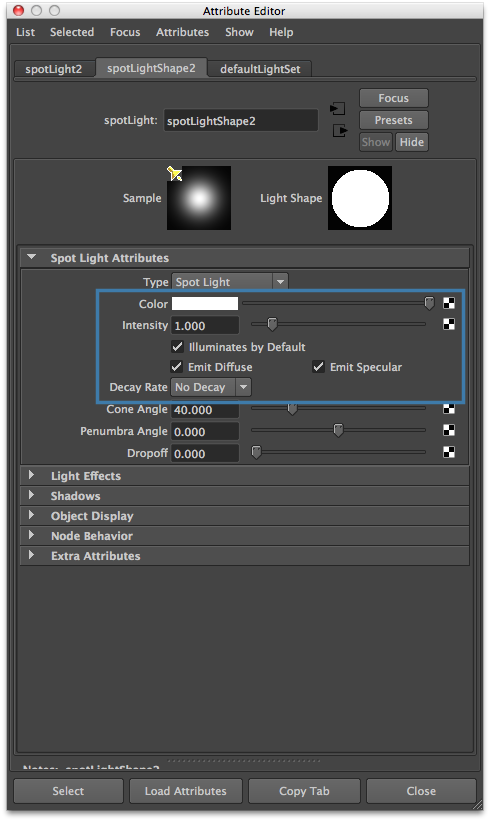
### Spot light attributes

### Absorption, reflection, and refraction of light
The color of the objects we see in the natural world is a result of the way objects interact with light. When a light wave strikes an object, it can be absorbed, reflected, or refracted by the object. All objects have a degree of reflection and absorption.


### Light decay
In the real world, a light’s brightness is strongest at the light source and decreases or decays further away from the light source. In Maya, a light’s brightness decays only if decay is turned on (see Decay Rate). The light’s color, however, remains the same no matter how far it is from the light source.

You can also create decay effects not seen in the real world (only for a Spot light in Maya). For example, you can use a custom Intensity curve to make a spot light’s brightness increase further away from the light source, or you can use a custom Color curve to make the color of a spot light change with distance.

________________________________
## Creating shadows
- Define from light sources.

## Controlling soft shadows
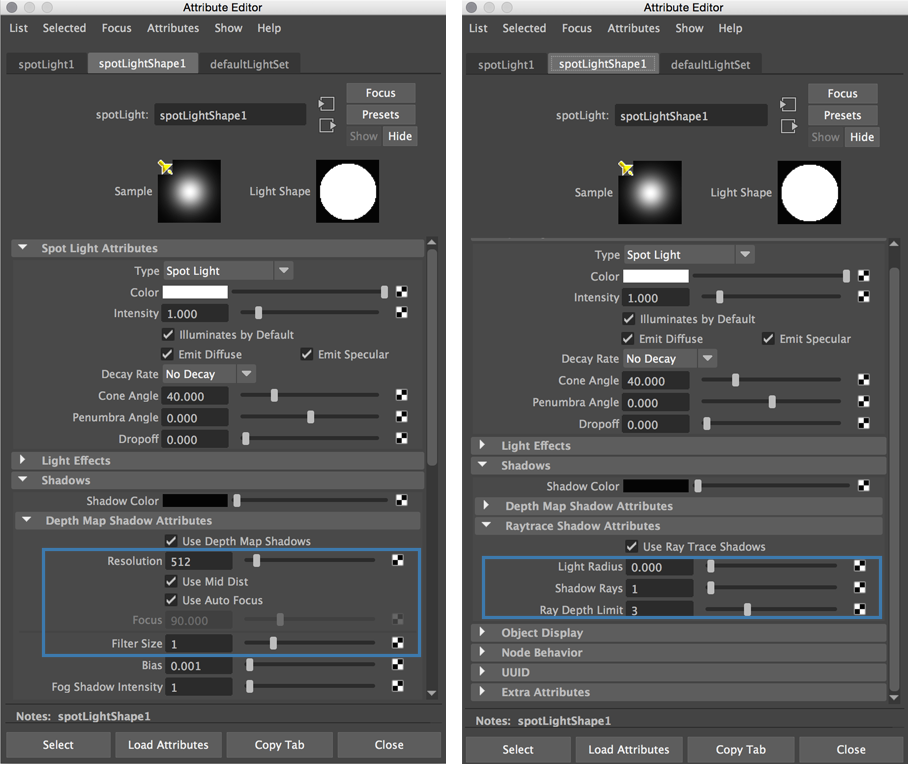
In the case of a depth map shadow: increase the filter size to gain soft shadow ([Autodesk knowledge network: Shadow attributes](https://knowledge.autodesk.com/support/maya-lt/learn-explore/caas/CloudHelp/cloudhelp/2016/ENU/MayaLT/files/GUID-5C4A0775-AF52-42D3-A8D5-299C723D871D-htm.html) ).
- Filter Size:
Controls the softness of shadow edges. (The softness of shadow edges is also influenced by the size of the shadow and the Resolution.) Increasing Filter Size also increases rendering times, so set it to the lowest value that produces acceptable results. A Filter Size of 3 or less is usually sufficient. The valid range is 0 to infinity. The slider range is 0 to 5. The default value is 1.
In the case of a raytrace shadow (it is more computationally expensive):
- Shadow Radius, Light Radius, Light Angle
Controls the softness of shadow edges by setting the size (Shadow Radius or Light Radius) or angle (Light Angle) of the light. For example, a large light produces softer shadows than a small light. The light radius is also used for light glows to determine the occlusion/visibility (for point and spot lights).
The Shadow Radius attribute is only available for ambient lights.
The Light Radius attribute is only available for point lights and spot lights. The slider range is 0 (hard shadows) to 1 (soft shadows). The default value is 0.
The Light Angle attribute is only available for directional lights. The slider range is 0 (hard shadows) to 180 (soft shadows). The default value is 0.
- Shadow Rays:
Controls the graininess of soft shadow edges. Increasing the number of Shadow Rays also increases rendering times, so set it to the lowest value that produces acceptable results. The slider range is 1 to 40. The default setting is 1.
_______________________________
## Post processing: depth of field
Reference: Advanced Maya® Texturing and Lighting, Second Edition by Lee Lanier, 2008
Depth of field is the range of distances that encompass objects that appear acceptably sharp. Due to the optical nature of real-world lenses and the physical qualities of the atmosphere, photography and videography rarely produce images that are 100 percent in focus. In contrast, 3D renders are always in perfect focus unless artificial depth of field is used.
You can activate Maya's depth of field by checking the Depth Of Field attribute in the Depth Of Field section of the camera's Attribute Editor tab.

The F Stop attribute roughly approximates the f-stop of real-world cameras. F-stop is a number that represents the ratio between the diameter of the lens aperture and the focal length of the lens. F-stops are scaled by an approximate factor of 1.4 (for example, f/1.4, f/2, f/2.8, and so on). Each increased f-stop halves the open area of the aperture, halves the amount of light striking the film, and increases the depth of field. The f-stop isn't the only factor to influence depth of field, however. Depth of field is inversely proportional to the focal length of the lens and directly proportional to the distance from the camera to the subject.

The Distance tool is used to determine the focus distance. Alternatively, you can turn on Display/Heads Up Display/Object Details to see the distance from the selected object to the camera.

An artificial depth of field is constructed by masking multiple copies of a render and applying different strength Gaussian blurs.

Hardware DoF effect: [the depth of field effect in Viewport 2.0](http://help.autodesk.com/view/MAYAUL/2016/ENU/?guid=GUID-93DFCF2E-1B24-4C4C-89FD-4C4C202746ED)
__________
## Reference
[Maya 2018 online Help](http://help.autodesk.com/view/MAYAUL/2018/ENU//)
- Art of Maya [pdf link](http://web.cse.ohio-state.edu/~parent/classes/682/MAYA/art_of_maya.pdf)
- Digital Cinematography. p.69~73.
- Rendering. p.75~79.
- Book: Advanced Maya® Texturing and Lighting, Second Edition.
- Book: Mastering Autodesk Maya 2016.
## Inspiration
- [Limbo](http://playdead.com/games/limbo/) by Playdead.
- [Inside](https://playdead.com/games/inside/) by Playdead. [Wikipedia: Inside](https://en.wikipedia.org/wiki/Inside_(video_game)
- [GDC presentation pdf](https://twvideo01.ubm-us.net/o1/vault/gdc2017/Presentations/Grontved_Huddle%20Up!%20Making.pdf) p.87 Surface Appearance.
# Lab
## To do list
- Lab practice A: Scene preparation
- Lab practice B: Practicing lighting & cameras
-------------------------------
## Lab practice A: Scene preparation
### Example studio

## Lab practice A: Scene preparation
1. create a pedestal (a box or a cylinder).
2. create a suface back-wall (Create Curve & Loft).
3. **import an object** (you can download them from [GettingStarted2015LessonData](https://knowledge.autodesk.com/support/maya/getting-started/caas/CloudHelp/cloudhelp/ENU/123112/files/maya-advance-techniques-html.html) or here ([low resolution toad](obj/toad_low.obj) and [high resolution toad](obj/toad.obj)) ). ***obj file is good to use when you export and import your polygon object in Maya.***
4. lay them out in your studio environment as you like.
_______________________
>- tip:
1. using grid snap (key x)
2. modify center pivot (using grid snap and key d)
3. using Modify / Freeze Transformations to create new local center (see what happens to the transformation info)
>- Obj file
> 1. Open 'Toad_hi_res.mb' file from [GettingStarted2015LessonData / UVmapping](https://knowledge.autodesk.com/support/maya/getting-started/caas/CloudHelp/cloudhelp/ENU/123112/files/maya-advance-techniques-html.html) folder
> 2. **Export** (File / Export Selection..) as [obj file](http://en.wikipedia.org/wiki/Wavefront_OBJ) (if you can't find obj file format, you can load objExport.bundle from Windows / Settings / Preferences / Plug-In Manager)
> 3. Save the obj file in the Data folder in your working Maya project folder.
### Lighting practice tip
#### Lighting by light attributes (using light Attribute Editor):
- You can turn on or off *Illuminates by default*.
- You can change the light Color to distinguish between different lights.
- Position the key light using **Look Through Selected** from a view panel menu (Panels / Look Through Selected).
 Changing colors.
 Look Through Selected.
### Creating your custom camera and render from it
1. Create a camera with an aim (Create/Cameras/Camera and Aim).
2. To display objects, you can switch the camera from: (View panels: Panels / Perspective / or Panels / Orthographic /)
3. Adjust the position of the camera (View panels: Panels / Look through Selected)
4. Move the camera and its aim separately. You can turn on snapping.
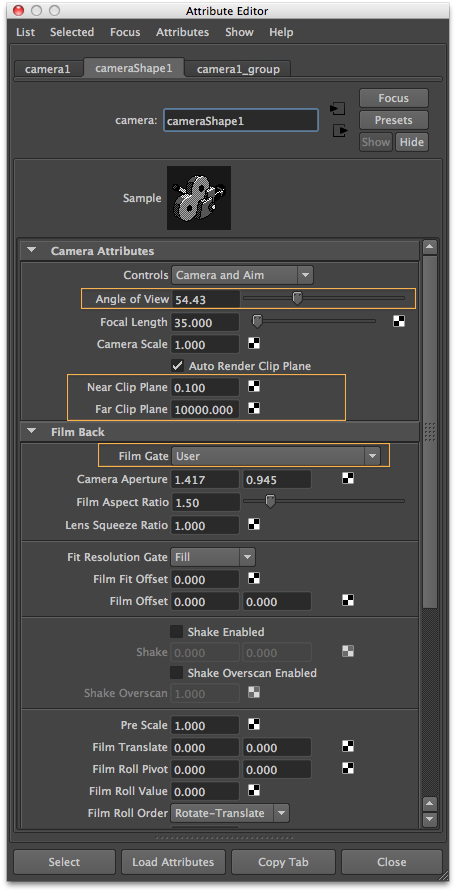
5. Change the camera's attributes: (View panels: View / Camera Attribute Editor... or using the outliner window)
- Angle of View, Near and Far clip, Film Gate..
6. From the Render View window, you can switch cameras (Render View: Render / Render / your custom camera)
7. Render to check.
_____________________________
## Lab practice B: Practicing lighting & cameras
### Creating lights and rendering
1. Applying a key light and make a shadow and render to verify the result.
- Once you make any light, the default Maya light will be turned off.
- You can start with spot light.
- In the attribute editor, change **Cone Angle** and **Penumbra values** to see the effect.
- Turn on **Depth Map Shadows** (Resolution: 512, Filter Size: 4) to create a shadow in the same attribute editor.
- Render a test view to check.
2. Applying a fill light.
3. Applying a back/rim light.
4. Experimentation to create your own style to fulfill your aesthetics and goal/intention.
#### Let's practice more!


### Light linking
You can link lights with surfaces so that only a specific light (or group of lights) illuminates a specific surface (or group of surfaces), or, conversely, only a specific object (or group of objects) receive illumination from a specific light (or group of lights). Light linking can help you render scenes more efficiently and quickly.

Where the light linking window is.

View in the viewport. Check the blue back light. The ground has too much attention.

Final render image. The ground is unlinked from the blue back light.
### Depth of Field (DoF) rendering
- Choosing Camera properties: (select Camera -> Attribute Editor)
- Angle of View, Near and Far clip, Film Gate
- Measure the distance between main object to the camera (Create/Measure Tools/Distance Tool) or you can find the distance information from Display/Heads Up Display/Object Details.
- Use this distance for the Focus Distance in the Attribute Editor of the camera
- Check the Depth of Field (select Camera -> Attribute Editor), change the Focus Distance and F Stop

#### Using depth of field


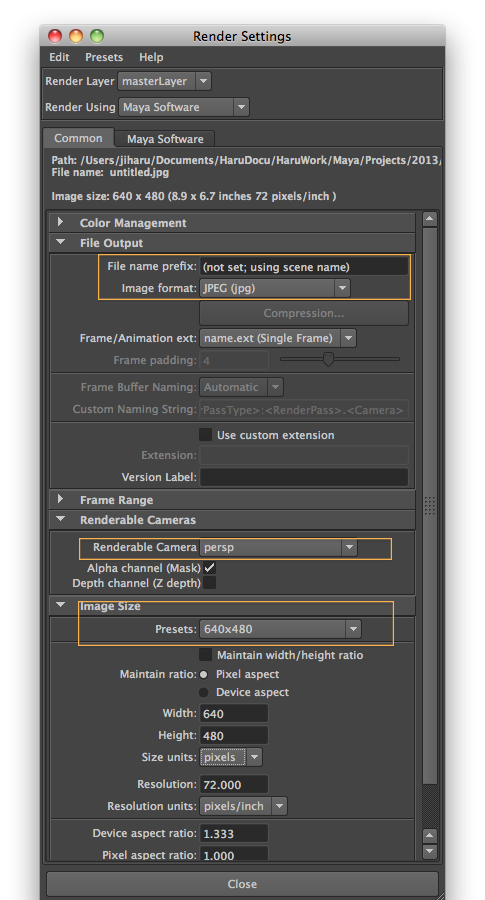
### Render the scene. Do basic render settings:
- Choosing Rendering properties: (Window/Rendering Editors/Render Settings)
- Choose Common settings
- File name, Image format, Choose camera, Choose Image Size
- Choose Specific settings -> Maya Software
- Quality, Anti-aliasing, Raytracing, Motion Blur

________________________
## Lab work to do
- Practice your lighting set-up to control the overall contrast, visible details, and dramatic mood of your scene.
- Apply soft shadows.
- Experiment your scene by applying cinematography techniques.
____________________________
# Action items
- Web tutorial: [Lynda.com: Maya 2018 essential training by George Maestri.](https://www.lynda.com/Maya-tutorials/Maya-lights-lighting-types/604210/644616-4.htmll)
- Render in Maya.
- Maya lights and lighting types.
- Understanding cameras.
- Use the Light Editor.
- Art of Maya [pdf link](http://web.cse.ohio-state.edu/~parent/classes/682/MAYA/art_of_maya.pdf)
- Digital Cinematography. p.69~73.
- Check more references, if you need:
- Advanced Maya® Texturing and Lighting, Second Edition.
- Mastering Autodesk Maya 2016.