# Review
## Batch rendering
A batch file is a set of commands given to the computer to do, one after another. Using batch files, you can queue several rendering tasks at the same time, so that once one is finished, the next begins. Batch rendering often occurs as a different thread or process, as if it were a different program running in the background, so Maya allows you to keep working while the batch is rendering.
Note that if you want to use Arnold batch rendering without watermarks in Maya, you need to purchase an Arnold license. Or alternatively you can render **a sequence in Maya with the Render > Render Sequence command in the Render setting window**; however you will not be able to use Maya while it is rendering.
## Camera Animation

- A simple camera setting for camera animation.
# Smoothing Polygon surfaces
- [Autodesk: Smoothing polygons](http://help.autodesk.com/view/MAYAUL/2018/ENU/?guid=GUID-8A5D0FF0-9BA1-435F-A4CA-53183311B819)
- Smooth a mesh by adding new polygons
- Smooth mesh
- Subdiv proxy
- Smooth a mesh by averaging the distance between vertices
- Subdivision surface
- Other than these methods, to see a smooth version of a model, you can soften the normals too (Modeling // Mesh Display / Soften Edge).
## Subdivision surface
A subdivision surface lets you subdivide specific regions of a mesh, giving you the ability to finely tune or smooth certain areas without changing the entire mesh.
Subdivision surfaces help you keep a lower polygon count because they only insert control points where you need them (instead of uniformly across the entire mesh). However, subdivision surfaces have the slowest performance of the three smoothing methods.
### OpenSubdiv
OpenSubdiv is an open-source subdivision method developed by Pixar that lets you work with a high-fidelity representation of your model with great accuracy and speed. As a professional standard in the animation industry, OpenSubdiv is implemented in a variety of software packages, improving interoperability by producing the same results when models are transferred between applications. In Maya, OpenSubdiv is the default subdivision method when you preview a smoothed mesh, smooth a mesh using Mesh > Smooth, or create a subdiv proxy.

- Check to make a layer for the subdiv proxy.
## Maya subdivision tutorial
- [Maya Subdivision Surfaces](https://www.youtube.com/watch?v=LpyJv8hhW_o&index=1&list=PL4fkBUcbgjGXSR7PUnjBuOSO3sDcLRF2F)
- [Intro to Maya and 3D Modeling - Lecture B: 5/13 - Subdivision and the Rule of 3](https://www.youtube.com/watch?v=70e-3bidL-w)
# Rendering using Arnold
## Practice: Three spheres and using HDRI or PhysicalSky

### Scene preparation
- Modeling: Creating three spheres and one plane or box.
- Shading: Apply AiStandardSurface to each ball. From its attributes, start from Presets: Glass preset for one ball, Chrome preset for another ball, and Rubber preset for one ball and tweak them. For the glass's transparency, change the weight value for its transmission attribute. [Arnold manual: Transmission](https://support.solidangle.com/display/A5AFMUG/Transmission)
- Rendering: In the Rendering setup, open Arnold/ArnoldRenderView. Run Render/Run IPR(Interactive Photorealistic Rendering).
- Lighting: Creating Arnold SkyDome Light or PhysicalSky Light. Arnold creates a sphere geometry as a SkyDome.
- If it is SkyDome Light, from its color tab, link to a HDRI image you chose using the File utility.
- To obtain HDRI; [sIBL Archive](http://www.hdrlabs.com/sibl/archive.html)
- You can transform the SkyDome sphere to find the best background as well as light conditions.
- You can change variable attributes (intensity for brightness, samples for smooth shadow, visibility for overall lighting effect) to find the best result.
- If it is PhysicalSly light, you can tweak its aiPhysicalSky attributes.
- Render Setting: Balance render quality & computational time at Arnold Renderer/Sampling, and control ray depth. [Arnold manual: Samples](https://support.solidangle.com/display/AFMUG/Samples), [Arnold manual: Ray Depth](https://support.solidangle.com/display/AFMUG/Ray+Depth)
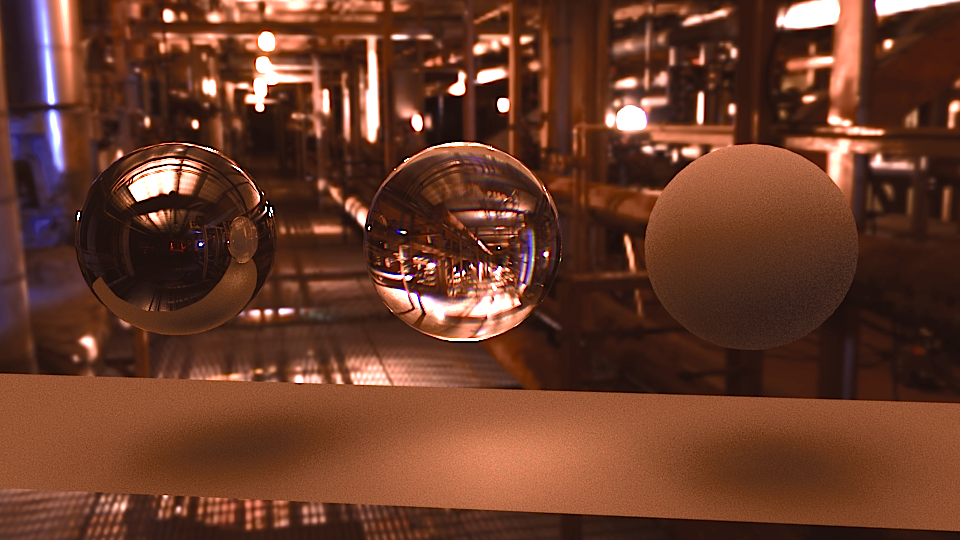
HDRI image from sIBL Archive. H Ji.
# Advance topic
## Ambient occlusion
**Ambient occlusion** refers to the attenuation of indirect or diffuse light on an object. It refers to the darker areas of the object such as in creases, cracks, and crevices. Ambient occlusion is caused by indirect light's inability to bounce around and illuminate areas that are blocked by nearby features, that instead absorb the light rays. **These subtle variations in lighting are visual clues for our eyes to detect surface details and distinctions** that would otherwise be washed out and unnoticeable. Ambient occlusion adds realism to your scene by adding shadows in crevices, nooks and crannies, and so on. For each surface point, it calculates how much light is blocked by other geometry.
In the example below, the ice blocks stand out because of the shadowing between them. The cracks between the ice bricks appear darker because the light is blocked by the ice bricks' local geometry.


Applying normal map, © CC BY-SA 3.0
When ambient light is used, objects in your scene may appear to be too bright and geometric detail may become lost. Ambient occlusion solves this problem by subtracting ambient light and thus adding shadowing.


## Creating ambient occlusion textures
There are several ways to apply ambient occlusion.
### Toad objects
You can download the toad object files from here: [toad high resolution](obj/toad.obj), [toad low resolution](obj/toad_low.obj)
### Ambient occulusion using Arnold in Maya
- [Tutorial: Ambient occlusion using render layer.](https://www.youtube.com/watch?v=75JFUwA5XL0)
Or, you can apply the ***aiAmbientOcclusion*** Arnold shader directly to your object.
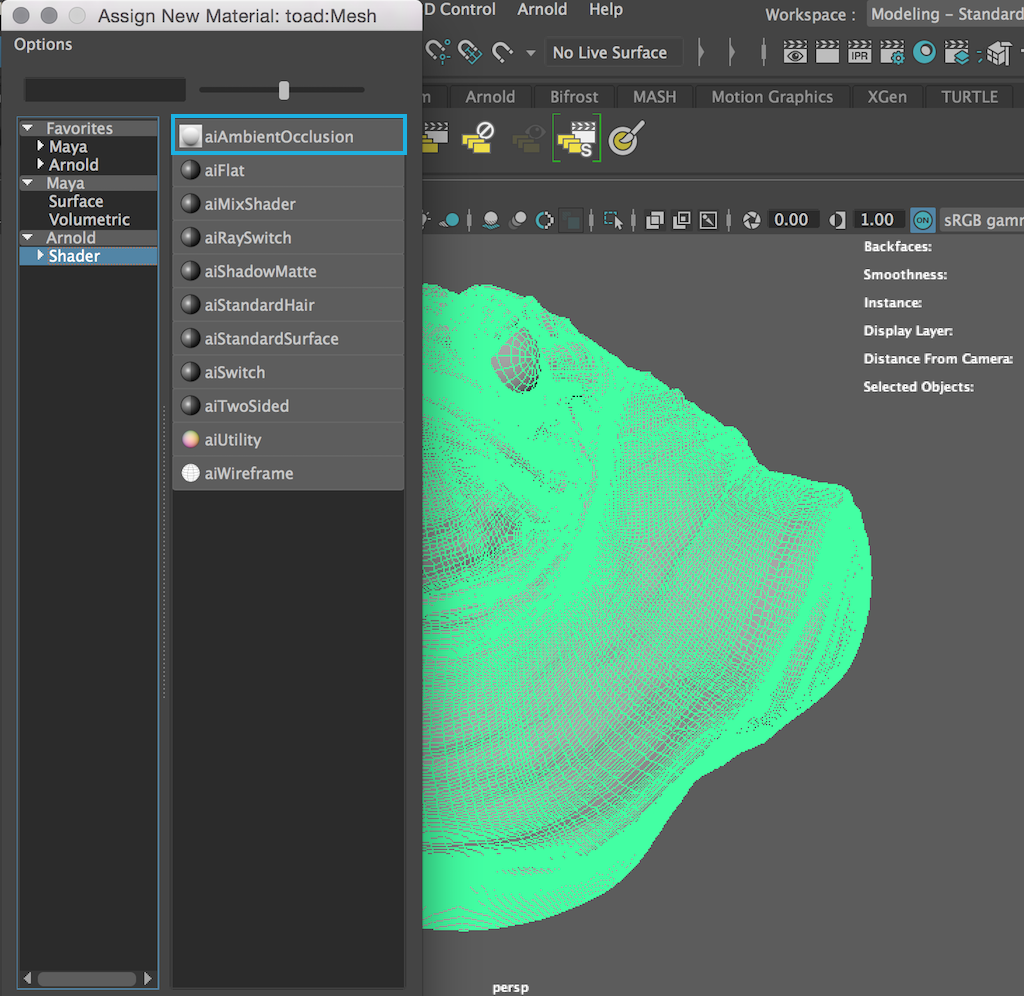
When you tweak ambient occlusion parameters, please check the [Arnold manual: ambient_occulson](https://support.solidangle.com/display/NodeRef/ambient_occlusion).


Comparison: ambient occlusion surface shading using Mental Ray.
## Baking a texture
You can "bake" lighting, texturing, and shadow information. Command location: in the "Rendering" module, go to Arnold/Utilities/Render Selection To Texture.
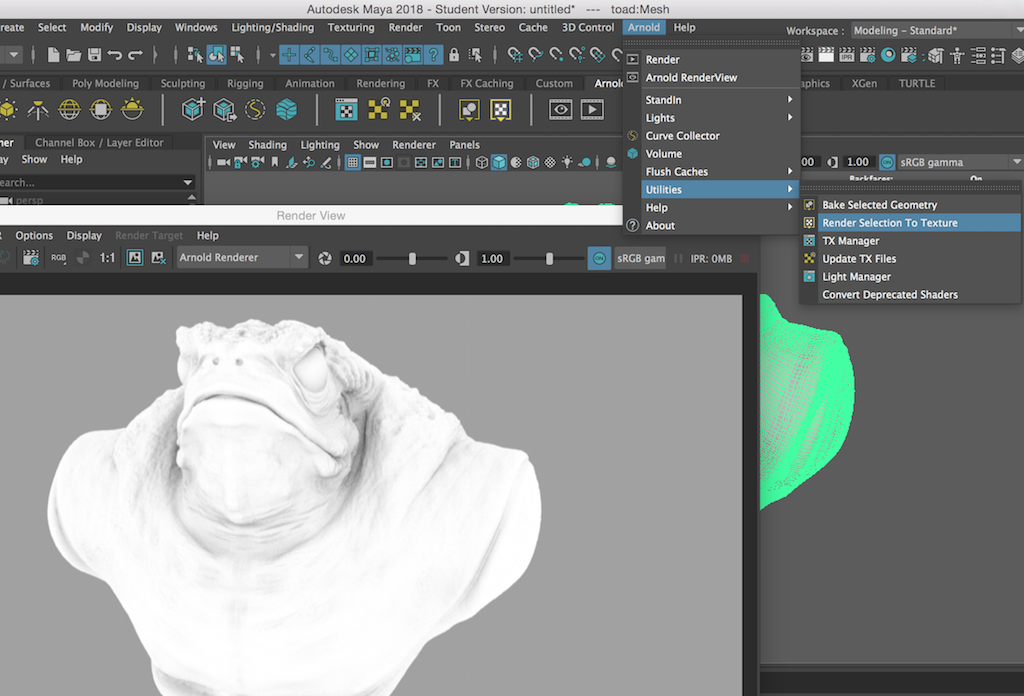
### Test image

Image by Haru Ji.
## Creating textures with an occlusion map using Photoshop
- Once the bake is completed open the project file that you specified earlier.
- In that folder, select your baked texture file and open this with Photoshop.
- Drag the Occlusion bake on top of your model's texture layer(s) and select Multiply as the layer blending mode. You may also want to apply a slight Gaussian blur to your occlusion layer, especially if it being used on an organic surface. For hard sharp edged surfaces like this one no blur was applied.
### Creating textures for composition
You can download these images for your rendering practices.
, 
Initial skin map for the color map & ambient / bump map
, 
Color map & specular map.
### Applying baked maps to a high resolution surface.

Texturing on the high-res Toad geometry. All images by Haru Ji.
### Applying baked maps to a low resolution surface to create ***Level of Details***.
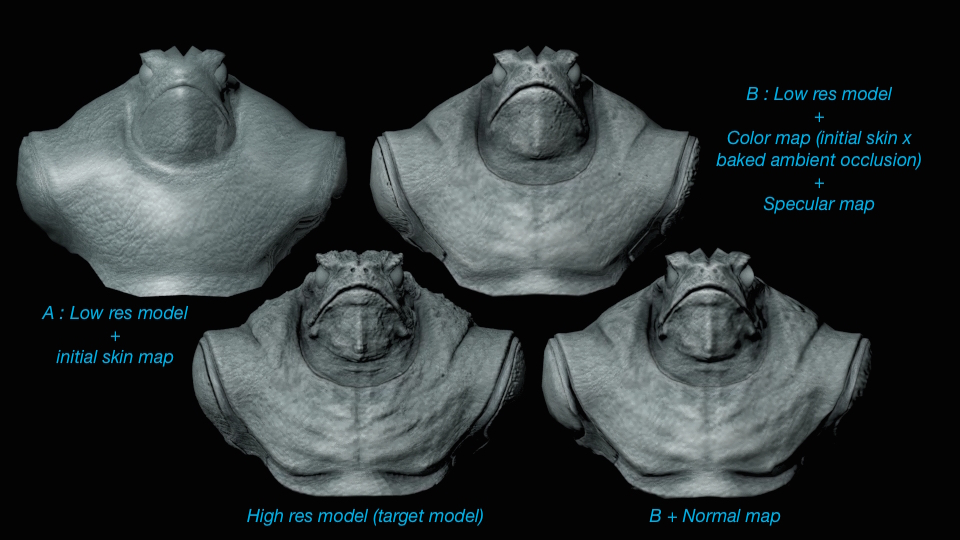
Texturing on the low-res Toad geometry.
### Blending different shaders in Arnold
The ***Mix Shader*** shader is used to blend or add two shaders (including light AOVs). It returns a linear interpolation of Shader1 and Shader2 according to the Mix Weight attribute. A Mix Weight value of 0 outputs Shader1, a value of 1 outputs Shader2, and a value of 0.5 mixes evenly between Shader1 and Shader2.
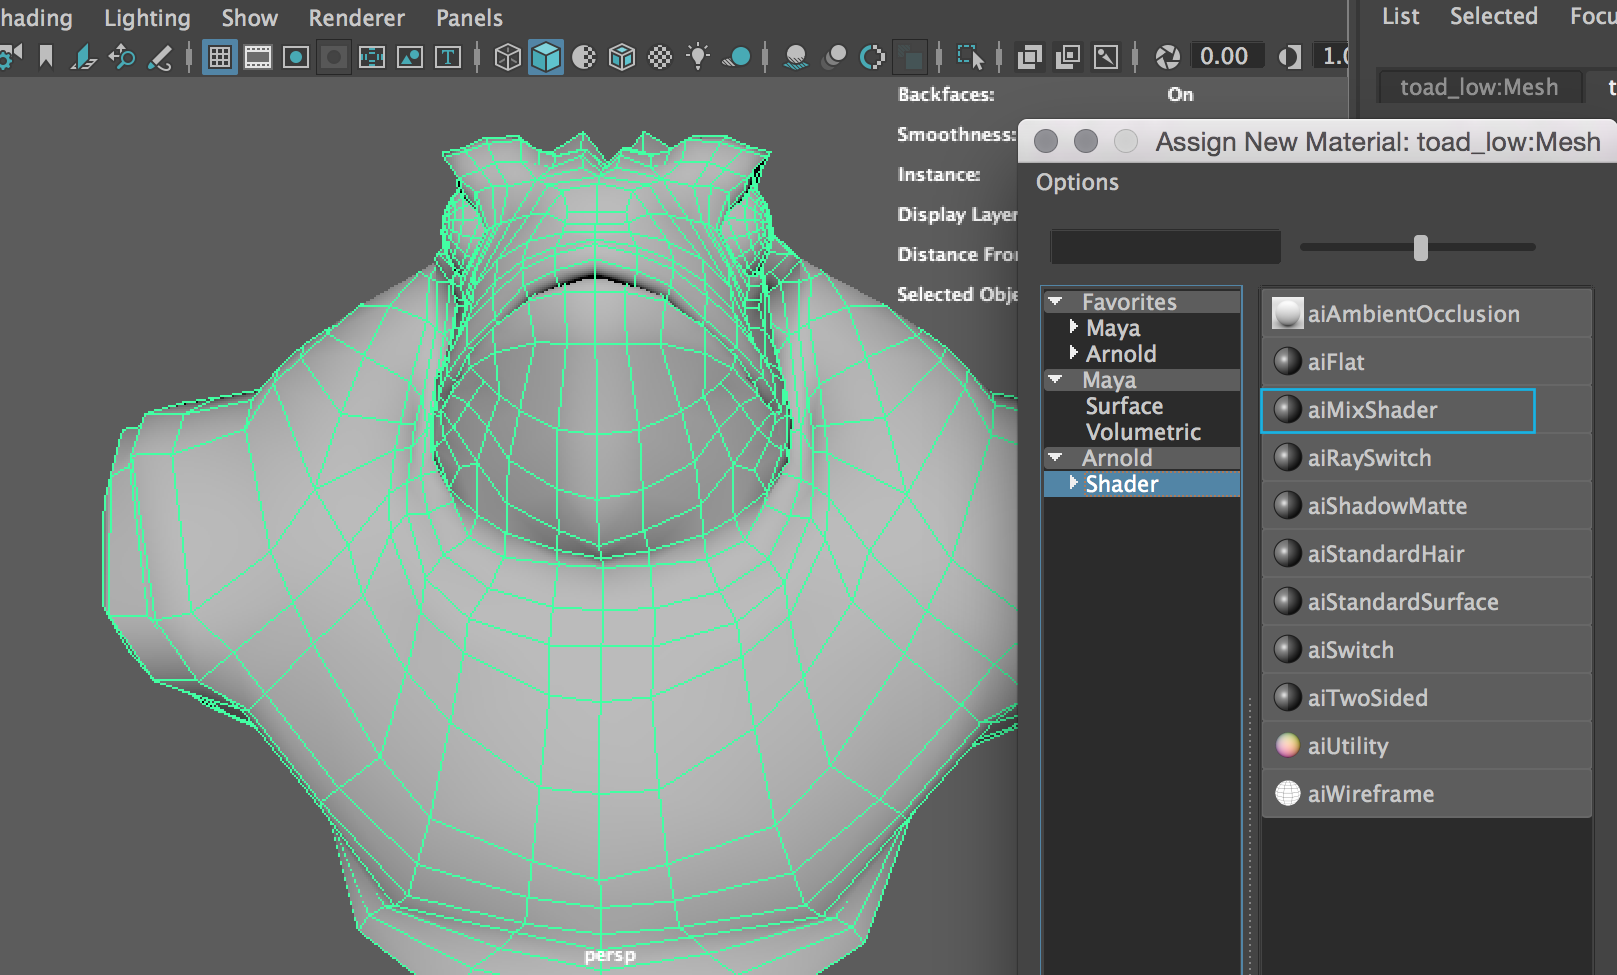

Applying a chequer texture to the ***Mix Weight*** attribute of the ***aiMixShader***.
#### Blending examples

aiWireFrame + aiAmbientOcclusion

aiWireFrame + aiStandardSurface (Jade preset)
- [Arnold manual: mix shader](https://support.solidangle.com/display/A5AFMUG/Mix+Shader)
- [Arnold manual: AOVs](https://support.solidangle.com/display/A5AFMUG/AOVs)
_________________________
# Visual effects
## Maya classic dynamics
Dynamics is a branch of physics that describes how objects move. Dynamic animation uses rules of physics to simulate natural forces. You specify the actions you want the object to take, then let the software figure out how to animate the object.
Dynamic animation lets you create realistic motion that's hard to achieve with traditional keyframe animation. For instance, you can make effects such as tumbling dice, waving flags, and exploding fireworks.
The Maya Dynamics guide, which provides information about creating dynamic simulations in Maya, is available at [http://www.autodesk.com/maya-docs-archive](http://www.autodesk.com/maya-docs-archive).
## nDynamics simulation framework
nDynamics is a dynamic simulation framework powered by Maya® Nucleus™ technology. A Maya Nucleus system is composed of a series of Nucleus objects, which consists of nCloth, nParticle, nHair, Soft Bodies, and passive collision objects, as well as dynamic constraints, and the Maya Nucleus solver.
## Effects Assets in the Visor
Effects Assets provides a number of preset effects that are organized as Maya assets. Effects Assets are available in the Visor window and can be quickly imported into your scene, applied to objects, then played and rendered with little or no modification. Effects Assets include 3D fluid effects, nParticles, nParticle emitters, and Maya fields, and provide effects such as explosions, fire, smoke, rain, and fireworks.

Effects Assets are advanced assets, which allow them to be parented to objects outside the asset. For example, some assets, such as a fire asset, can be parented to a polygon object or applied as a surface emitter. Depending on the effect, selecting Effects Assets > Apply Effect from the FX menu set either parents the effect to an object, or applies it to a surface. Effects with Point or Volume emitters are parented while Surface emitter are applied. Free-standing effects, such as the Bomb.ma, do not need to be applied to objects in the scene. - [Maya help](http://help.autodesk.com/view/MAYAUL/2016/ENU/?guid=GUID-235C9A6C-42C9-4132-81BE-727B4A43AB1B)

Rendering image of Visor/nCloth Examples/PartyStreamers.ma

Rendering image of Visor/Fluid Examples/Nuke.ma
- [Maya help: Simulation and Effects](http://help.autodesk.com/view/MAYAUL/2016/ENU//index.html?guid=GUID-04EA8AE9-5081-426F-8122-D56461A69B0A)
## Ocean Shader & Bifrost
- [Maya Ocean shader test by LTKY823](https://www.youtube.com/watch?v=8fqUvntiuSw)
### Bifröst
**Bifröst** is a procedural framework that can create simulated liquid effects using a FLIP (fluid implicit particle) solver. You can generate liquid from emitters and have it fall under gravity, interact with colliders to direct the flow and create splashes, and use accelerators to create jets and other effects.

- [bifrost simulation](http://www.igorfx.com/bifrost/)
- [knowledge.autodesk.com](http://knowledge.autodesk.com/support/maya/learn-explore/caas/CloudHelp/cloudhelp/2015/ENU/Maya/files/GUID-43D655E2-45A3-4FD8-847C-6622AF22995C-htm.html?v=2016)
- [simple tutorial](https://www.youtube.com/watch?v=ZrVW1Izzb7c)
---------------
## Paint effect
- [Maya Paint Effects Tutorial: Growing Animated Vines](https://www.youtube.com/watch?v=Y1ignag-NmY)
**Paint Effects** is a powerful tool that allows you to interactively paint specialized strokes that create complex geometry as a post-process. Numerous Paint Effects brushes are included with Maya and are grouped in such categories as trees, flowers, weather, and fire.

You can use Paint Effects as a traditional paint program to paint images on a canvas, or to paint repeatable textures that you can apply to geometry in your scenes.
### Paint Effect attributes
After you create a Paint Effects stroke, you can edit the look and movement of the effect through the Attribute Editor. There are a large number of attributes to edit with Paint Effects.
- Select the stroke, and open the Attribute Editor. Switch to the stroke’s tab to the brush attributes.