# Week 7
___________
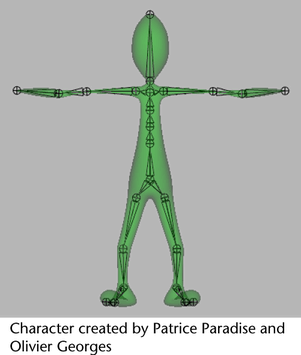
# Joint system
## Skeletons & Skinning
**Skeletons** are hierarchical, articulated structures that let you pose and animate bound models. A skeleton for a human avatar provides a deformable model with the same underlying structure as the human skeleton gives the human body.
Just like in the human body, the location of joints and the number of joints you add to a skeleton determine how the skeleton’s bound model or ‘body’ moves. When you bind a model to a skeleton, it is called **skinning**.
### Skeleton components
A skeleton is composed of a series of **joints** and **bones** that form joint chains. You can pose and animate these joint chains using IK (inverse kinematics) handles or by translating or rotating individual joints (FK: forward kinematics).

### Joints
Joints are the building blocks of skeletons and their points of articulation. Also, joints have no shape and therefore can not be rendered. Each joint can have one or more bones attached to it, and a number of child joints. Joints let you transform a skeleton when posing and animating a bound model.
### Bones
Bones do not have nodes, and they do not have a physical or calculable presence in your scene. Bones are only visual cues that illustrate the relationships between joints.
### Joint chains
A joint chain is any group of joints and their bones connected in a series. Joints are connected linearly, and their paths are drawn on screen by the bones. A joint chain begins at the highest joint in the chain’s hierarchy, and its bones are drawn pointing down the chain.

###Skeleton hierarchy
A **parent joint** is any joint higher in a skeleton’s hierarchy than any of the other joints that are influenced by that joint’s actions. Joints below a parent joint in the skeleton hierarchy are called **child joints**. Joints at the top of bones are always parents, and joints at the bottom of bones are always children. Parent joints drive the transformations of their respective child joints. Thus, when you translate or rotate a parent joint, you also translate or rotate all of its child joints.

The **root joint** is the highest joint in a skeleton’s hierarchy. A skeleton can have only *one* root joint. You can move and orient the entire skeleton in world space by translating and rotating the root joint.

# Kinematics
***Kinematics*** is the study of the motion of objects. This is related to, but distinguished from, dynamics in that kinematics studies only the way in which objects move and not the cause of the objects’ motion. In 3D computer graphics, the term kinematics describes how joints can be moved to animate objects and characters. There are two main types of kinematics: ***forward kinematics*** and ***inverse kinematics***.
## FK & IK
The term forward kinematics (FK) refers to a situation in which each joint in the chain inherits the motion of its parent joint. Thus, if you have four joints in a chain, when you rotate the root, the three child joints move based on the rotation of the root. When you rotate the second joint, the third and fourth joints inherit the motion of the second.
Inverse kinematics (IK) cause the joints in a chain to orient themselves based on the position of a goal known as the end effector.
Inverse kinematics can be a more intuitive technique than forward kinematics in many situations. When used on legs, the Sticky option for inverse kinematics can prevent joints from penetrating the floor or sliding during a walk cycle.
## Inverse kinematics
With inverse kinematics (IK), you move an ***IK handle*** to pose an entire joint chain. An IK handle is an object you can select and move that affects the joints it is assigned to. A joint chain that has an IK handle is called an ***IK chain***. When you pose and animate a joint chain with an IK handle, the IK solver automatically rotates all the joints in the IK chain. The ***IK solver*** is what Maya uses to calculate the rotations of all the joints in the IK chain when you position the IK handle.
- [Inverse Kinematics in Maya](https://www.youtube.com/watch?v=u6ZCoiMTCSI)
# Skinning
Skinning (Binding) is the process of attaching a mesh to a skeleton. It is probably the most common type of mesh deformation with the use of joints, since it offers the most amount of flexibility. The setup is more time-consuming and complex than other methods, but the end results will be as detailed as you like to make them.
## Direct or indirect skinning
- **Direct skinning**: the mesh is bound directly to the joint. The vertices of the mesh get weighted by the joints around them.
- **Indirect skinning**: a deformer such as a lattice or a wrap deformer gets bound to the joint, and in turn they affect the underlying mesh.
## Three types of (direct) skinning
- **Rigid binding:** this allows a vertex to only have one joint influence it.
It is an old method of skinning, still good for mechanical objects, and computes extremely efficiently.
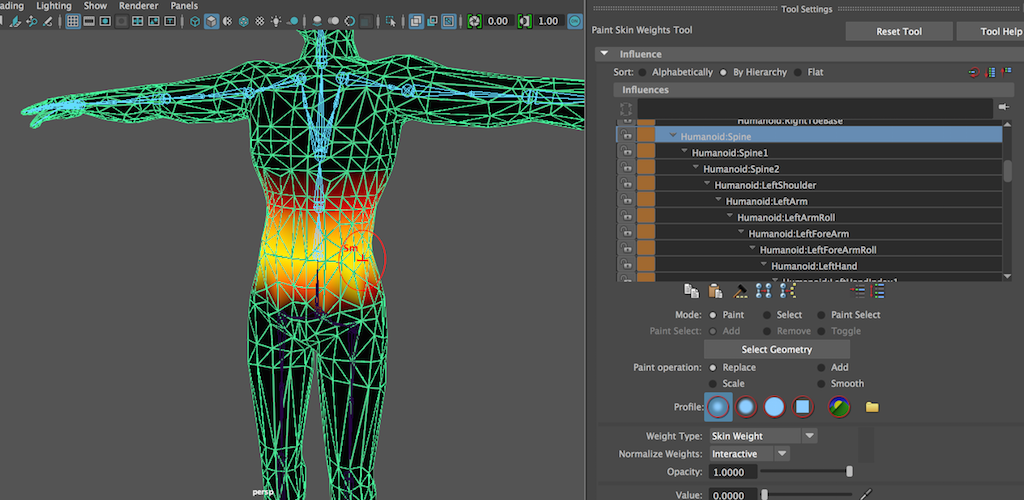
- **Smooth binding:** this allows a vertex to have multiple joints influence it. You can paint smooth weights to fine tune the vertex/joint assignments. This “painting weights” is usually what is referred to when someone says they are “skinning.”
- **Interactive skin binding (an extension of smooth binding):** The workflow for this is to do an interactive skin bind first. This method also allows you to paint weights for finer tuning after completing first rough adjustments with the interactive tool.
When testing skinning, sometimes you may notice that you don’t have enough places for your mesh to deform. If this is the case, you’ll need to insert some additional geometry (perhaps through something like the Insert Edge Loop Tool, or increasing subdivisions.)

Bind Skin: rigid binding emulation. Max influences: 1, Second joint rotate Z: 45.

Bind Skin: smooth binding emulation. Max influences: 5, second joint rotate Z: 45.
It also shows you the local joint orientations. How to see in the edit mode: select joints and push two buttons shown from the above figure.
## Joint orientation
One of the most important aspects of setting joints in Maya is to understand the concept of joint orientation. When an object is created in Maya, by default its pivot point is aligned to the World axis. Joints, on the other hand, have the ability to have their pivots created based on user input through the *Orientation Settings* and by *drawing the subsequent joints in the chain*.
To see the joint orientations in the object mode:
1. Click on the root joint in the chain.
2. Then select Select > Hierarchy. Once all the joints are selected, select Display > Transform Display > Local Rotation Axes. This will display the actual orientations of the axes on the selected joints.
How to change the local axis:
- You can use Skeleton > [Orient Joint](http://help.autodesk.com/view/MAYAUL/2016/ENU//index.html?guid=GUID-29DF5D0F-1BDE-4464-850C-45769B3CF1CA).
- Change it manually: make the local axes visible in the edit mode by selecting joints and push the component button and '?' button together in the status line. With the rotation tool, you can rotate to change the local axis. However, often it is not recommended. Check the below tutorial.
### Reference
- [ABOUT MAYA JOINT ORIENT by Rigging Dojo](http://www.riggingdojo.com/2014/10/03/everything-thought-knew-maya-joint-orient-wrong/)
# Controlling skin weights
## Painting weights
***Painting weights*** is the process of using a brush to paint values of color on the surface of the model to distinguish which areas are affected by the joints in the skeleton. Carefully painting smooth values in turn gives us smooth deformation in our model.
>Painting skin weights is a journey. When it’s working right, effective skin weights are magic as suddenly the character feels alive. But it takes a while to get them right. Even when you think they are right, once the character starts to animate, new problems will appear that weren’t obvious in the painting process.. A sloppy skin weight will forever affect the look of the animations you make with this rig. Getting it right is important.
- from Getting Started in 3D with Maya by Adam Watkins, Focal Press, 2012
### Maya help
- [Common Artisan Brush Tool Settings](https://knowledge.autodesk.com/support/maya/learn-explore/caas/CloudHelp/cloudhelp/2015/ENU/Maya/files/GUID-67B8F095-4A0E-4BAE-938C-CB41B3EBD533-htm.html)
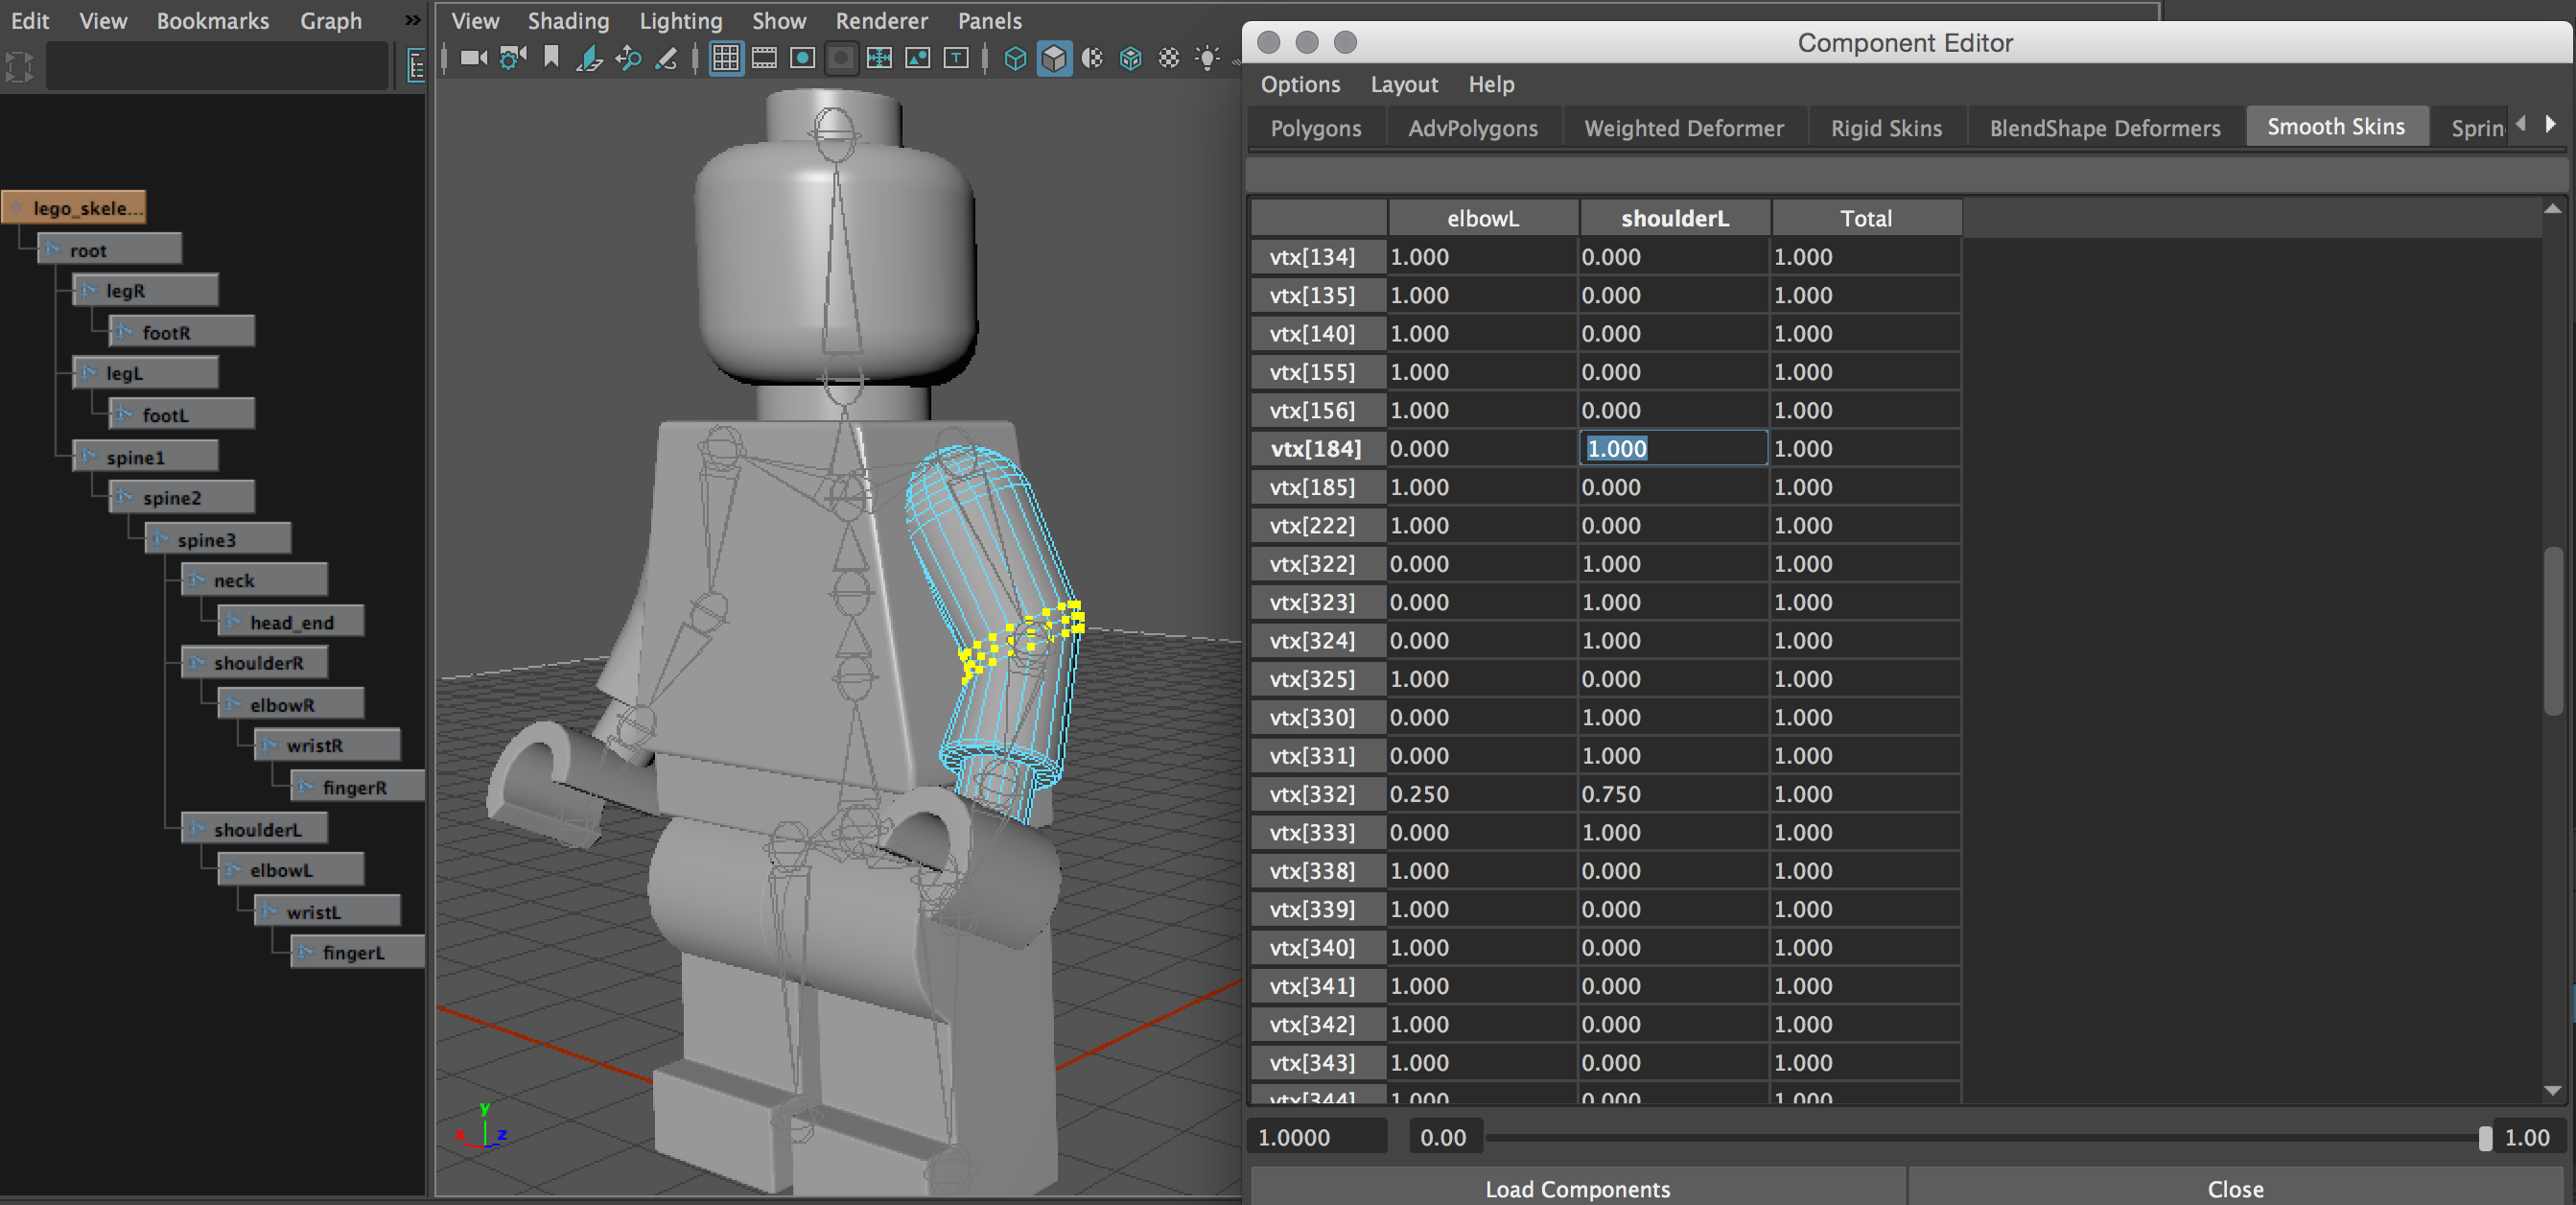
## Component editor
The most common way of editing the rigid weights (each mesh point is influenced by only one joint (in the Bind skin option, the max influence should bet set to 1.) is through the use of the Component Editor (Window > General Editors > Component Editor).
_____________________
# Rigging and character set-up
The character’s mechanics must be convincing to an audience and the skin and clothing
must also move and bend properly. Maya includes a number of tools that help you
manage the parts that make up a typical character. This process of preparing character
controls is called ***rigging*** and is used to let the animator focus on the process of animating.
A fully rigged character can be quite complex as it brings together skeleton joints, surfaces,
deformers, expressions, Set Driven Key, constraints, IK, BlendShapes, etc.
- [Example: Rigging Demo Reel by Hassan Bensmaine](http://www.cgmeetup.net/home/rigging-demo-reel-by-hassan-bensmaine/)
- [Tutorial: Basic Character Animation by Tales of Nalstone](https://www.youtube.com/watch?v=3tyQpoZsAJ4)
### Control set-up

### Control set-up for a walking man

## HIK
Human Inverse Kinematics (HIK) is used for full-body inverse kinematics. This system creates IK Handles that control an entire biped or quadruped skeleton rather than using multiple IK chains on individual limbs.

It is a powerful system capable of producing smooth animations quickly. In addition, the time it takes to set up a full-body IK skeleton is a fraction of the time needed to create your own rig. HIK is a plug-in, but it is loaded automatically by default.
Perhaps the greatest strength of the HIK system is its ability to retarget animations from one character to another. Characters of different sizes and proportions can swap motions.
### Skeleton generator
The HIK tools allow you to create a custom skeleton and rig or use the system’s Skeleton Generator. Bipedal or quadrupedal characters can be created, but all must be in a **T-pose** or **T-stance** looking toward **the positive z-axis**. The HIK system also requires a standard set of 15 bones.

### Character controls

The HIK system comes with a Character Controls panel that allows you to select the control handles of your character quickly and easily and to toggle among FK, IK, and full body IK. You can also click the encircled arrows to see exploded views of the hands and feet.
Within the Character Controls panel is a row of icons located above the Skeleton, Definition, and Controls tabs. The first two icons allow you to toggle the **visibility** of the FK handles and bones. The next icon toggles the visibility of the full body skeleton. By default, this is turned off. Go ahead and choose the Show/Hide Skeleton icon to display the full-body skeleton. Since it appears under the FK bones, click the Show/Hide FK icon to turn the FK bones off.
The next three icons—Full Body, Body Part, and Selection—control the **functionality** of the control handles on the character. Starting in reverse order, the Selection icon allows you to move a handle without having the bones follow along. The next, Body Part, treats the bones connected to the selected handle as an ordinary IK system. Choose this icon, and select the left wrist handle. You can select the wrist handle through a viewport or from the humanoid image within the Character Controls panel. Use the Move tool to see how it affects the skeleton. Use Undo to return the skeleton to its default position. Now select the Full Body icon, and move the wrist handle again. Notice the difference.
## Related reference
- [Prepare an existing skeleton for HumanIK](http://help.autodesk.com/view/MAYAUL/2016/ENU/?guid=GUID-8D27BAFD-7785-4173-860E-515FEB2E9C98)
- [Create and define a HumanIK skeleton](http://help.autodesk.com/view/MAYAUL/2016/ENU/?guid=GUID-795BDC06-8A1D-4D58-B55D-FD88D9B5A022)
- [Free Maya rigs](http://www.cgmeetup.net/home/ultimate-rigs-maya-rigs-maya-character-rigs-free-maya-rigs/)
- [Rig a Fish in Maya](http://cgi.tutsplus.com/tutorials/rig-a-fish-in-maya--cms-20873)
- [Mery Rig – Free Maya Character Rig, Female Character rig](http://www.cgmeetup.net/home/mery-rig-free-maya-character-rig-female-character-rig/)
- [Basic Character Rigging](https://courses.cs.washington.edu/courses/cse460/05sp/links/Rigging/basic_character.html)
----------------
## Mixamo
Mixamo develops and sells web-based services for 3D character animation. Mixamo's technologies use machine learning methods to automate the steps of the character animation process, including 3D modeling to rigging and 3D animation.
This is where you can find automated, finished characters & animations:
- [Mixamo](https://www.mixamo.com/)