# Maya Shading
## Goals
- Understanding what are shading, texturing, and materials.
- Differentiate between different shader types.
- Applying materials with proper textures onto different objects.
- Create and edit shader networks in the Hypershade window.
------------
### Indirect (global) vs. direct illumination

Indirect light is all the inter-reflected light in a scene. Global illumination is an approximation of real-world indirect light transmission.
Direct (local) illumination is the light provided only directly from a light source (such as a spot light). Direct light is emitted from a light source and travels in a straight path to the illuminated point on a surface.

Ray tracing is a technique for generating an image by tracing the path of light through pixels in an image plane and simulating the effects of its encounters with virtual objects. The technique is capable of producing a very high degree of visual realism, but at a greater computational cost. [-wikipedia](http://en.wikipedia.org/wiki/Ray_tracing_(graphics))
----------------------------
## Shading
**Shading** is the proper term for applying a renderable color, surface bumps, transparency, reflection, shine, or similar attributes to an object in Maya. It’s closely related to, but distinct from, **texturing**, which is what you do when you apply a map or other node to an attribute of a shader to create some sort of surface detail. Nevertheless, because textures are often applied to shaders, the entire process of shading is sometimes informally referred to as texturing. Applying textures to shaders is also called texture mapping or simply mapping. You map a texture to the color node of a shader that is assigned or applied to a Maya object.
In the real world, objects are seen in specific ways based on the following:
- The materials they are made of.
- Their surface textures.
- How they are lit and reflect light.
- The environment surrounding them.

In Maya, you provide your surfaces and objects with these characteristics by assigning shading materials to them.
Shading materials provide instructions to the renderer so it can simulate how the surfaces in your scene react to light and appear in the final image. Shading involves such attributes as color, transparency, shininess, and many others to create a realistic look.
## Shader types


## Shading materials in maya

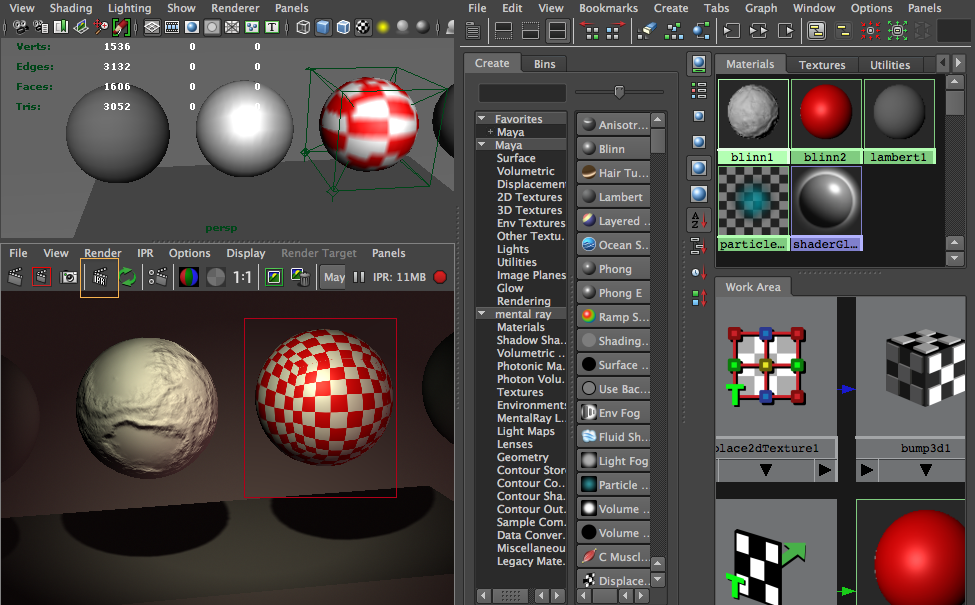
### Hypershade Editor

--------------------------
## Interactive Photorealistic Render (IPR)

Using **IPR (Interactive Photorealistic Render)**: As you work with shading, you’ll find many attributes that have no effect in the scene view, because the scene view is only a rough approximation of how the scene will render.
The IPR renderer is ideal for testing shading. It shows the results of all changes you make to shading and shows them immediately. However, some attribute changes such as reflectivity and reflections are not displayed.
------------------------------
## Related video
- [Maya 2016: Look Development Enhancements, New Look & Feel](https://www.youtube.com/watch?v=VRVXXw5NZC0)
### Helpful blog article
- [Pedro Toledo's blog: Brief Considerations About Materials](http://www.manufato.com/?p=902)
________________________
## Shader Attributes
**Color**: is the color of the object, such as red or blue. This can be a flat color or a texture map.
**Ambience**: is the amount of ambient color that will affect an object’s surface. Ambience in the surface property is a simulation of even flat lighting coming from every direction onto the surface (this is not from an actual light source).

Image from Introducing Autodesk Maya 2015: Autodesk Official Press
**Diffuse**: This value governs how much light is reflected from the surface in all directions. When light strikes a surface, light disperses across the surface and helps illuminate it. The higher this value, the brighter its object is when lit. The lower the Diffuse value, the more light is “absorbed” into the surface, yielding a darker result.

Image from Introducing Autodesk Maya 2015: Autodesk Official Press
**Transparency**: is how transparent or see-through the object will be. This attribute is used to create effects such as glass.
**Reflectivity**: is how reflective the object will be. The reflections can come from raytracing or from a reflection map.
**Refraction**: is the change in light direction caused by a change in speed that occurs as light passes through a solid, transparent object.
**Translucency**: is the amount of light that can pass through an opaque object such as paper or canvas.
**Incandescence**: is the quality of self-illumination—for example, a computer monitor that is emitting light or a lamp shade with the light on.
**Specular highlights**: are bright spots that appear on an object’s surface when light shines on that object.
**Glow**: is a standard attribute that most 3D applications can simulate to aid in the effect of self-illumination.

**Bump**: simulates a texture along the surface of an object by adding shadow and highlight effects along the surface. Bump maps are grayscale images in which a mid-gray color represents no change in the surface, black represents inward changes to the surface, and white represents a push outward in the surface. The bump map manipulates the surface normals to change the shading properties and make the surface looked textured.

_________________________________
## Textures
Maya material attribute editor and how to link textures

## Texture Map: procedural vs. bitmap
These two types of texture files, procedural and bitmap, are plugged into the shader properties as maps.
### Procedural Maps
Procedural maps are mathematical algorithms that create various patterns such as cellular, ramp (also known as gradient), grid, wave, fractal, and checker.

#### Advantages of Procedural Maps:
- **Resolution-independent**: Because these texture patterns are created by math, you can zoom in as close as you want without losing any detail in the pattern. This is helpful when you don’t know how close you need to get to the object.
- **Seamless**: Procedural textures are seamless, so no matter how much you scale them, you will never see a seam or repeating pattern.
### Bitmap File Textures
Bitmap file textures are the standard picture format that you would use in an image-manipulation program such as Adobe Photoshop. These are widely used because you have a lot of control of these textures and can even use real photographs as the starting place to achieve realism.
### Drawback to bitmap images:
- Resolution-dependent, which means that after you zoom into them beyond 100 percent resolution, they will pixelate and distort. This is not a big problem as long as you plan ahead and make the texture resolution large enough for your purposes.
#### Standard types of texture maps
**Color maps** indicate the color information only for the object you are trying to create.
A checker map applied to a sphere through the use of UVs.

**Bump maps** are grayscale images that affect the surface of the object by adding shadow and highlight to mimic a textured surface. Bump maps do not actually change the shape of an object.

**Specular maps** affect the way the specular highlights fall along the surface.

**Transparency maps** allow for varying degrees of transparency across a surface.

**Reflection maps** either can create an environment texture to apply to the object to make it look like it is surrounded by that environment or can affect how the real reflections of the object will behave.
**Displacement maps** are images that displace the actual geometry to create a new shape.

**Normal maps**, like bump maps, make a surface look textured. But unlike the bump map, which is a grayscale image, a normal map is a red, green, and blue image. Normal maps are used today in video games to create textured surfaces in a real-time rendering engine.
__________
## Inspiration
- [The loner](https://vimeo.com/32364450) : This little gem of a short is the product of Korean creators Sticky Monster Lab aka FLA. The film debuted at Seoul's first record and CD fair late last year, using the soundtrack of feel-good indie rock band The Freaks. But the film itself far from feel-good, instead delivering a dark take on friendship. From [creativebloq](http://www.creativebloq.com/3d-tips/10-best-short-films-in-3d-1233292)
- [This Way Up, the CGMeetup blog](http://www.cgmeetup.net/home/this-way-up/)
This Oscar Nominated short is directed by Smith & Foulkes and written by Foulkes, Smith, and Christopher O’Reilly, and produced at Nexus by Charlotte Bavasso and Christopher O’Reilly, the film follows two dour unfortunates as they battle a series of misadventures while trying to deliver a coffin to the graveyard.
- [Mr Head by Chris Jones](http://www.chrisj.com.au/)
- [The Digital Emily Project: Achieving a Photoreal Digital Actor](https://www.youtube.com/watch?v=piJ4Zke7EUw)
- [Digital Human R&D by Dexter Studios (Photorealistic 3D Model, Facial Rigs and Animation)](https://www.youtube.com/watch?v=CYBR6lCiQ6U)
- [Understanding Color by Blender Guru](https://www.youtube.com/watch?v=Qj1FK8n7WgY)
## Reference
[Maya 2016 online Help](http://help.autodesk.com/view/MAYAUL/2016/ENU//)
- Art of Maya [pdf link](http://web.cse.ohio-state.edu/~parent/classes/682/MAYA/art_of_maya.pdf)
- Materials and Textures. p.63~67.
- Book: Introducing Autodesk Maya 2015: Autodesk Official Press
_______________
# Review
## Assignment
- [Lab 1](http://2016datt2500.tumblr.com)
- [Lab 2](http://2016datt2500lab2.tumblr.com/)
- [Lab 3](http://2016datt2500lab3.tumblr.com/)
- [Lab 4]((http://2016datt2500lab4.tumblr.com/)
-----------------
# Lab
## To do list
- Lab practice A: Creating an eye
- Lab practice B: Apple shading
- Lab practice C: Shading practices
-------------------------------
## Practice goals
- Choose and assign a proper shading material with specific color and surface attributes.
- Assign a texture map (a bitmap or a procedural) to a surface.
- Control the placement of a 2D/3D texture using a 2D/3D manipulator.
- Use the Hypershade editor to view and work with shading materials.
___________________________
## Lab practice A: Creating eye
### Reference

Image from [Only Eyes Knew](http://www.onlyeyesknew.com/eye-anatomy/).
### A. Create eye shading using ramp + fractal textures:
[tutorial](http://www.spafi.org/index.php?option=com_content&task=view&id=449&Itemid=29F): An Eye Texture written by Danny McNezmo


1. Create a nurbs sphere and **rotate it in Z direction about 90 degrees**.
2. Open the Hypershade and create a new blinn material and assign it to the sphere.
3. **Press 6 to see textures in your work view**. Select the sphere and in the attribute editor click on the checker icon next to the color and in 2d textures choose the Ramp.
4. In the Ramp Attributes **set the Type on U Ramp and Interpolation on Bump**. Change the colors of the ramp to black and white. Make sure your ramp contains **four colors**.
5. Select the circle icon on the ramp which represents the second color. **Click on the checker icon next to the Selected Color** and from the 2d Textures nodes choose **the Fractal**.
6. Now make a test rendering. You can play a bit more with the setup of **the Fractal Attributes** and **the Color Balance**.
The color of an eye pupilla can be changed in the Fractal tab of the attribute editor. Go into the Color Balance and pick the new color of the Color Gain attribute.
_________________________________
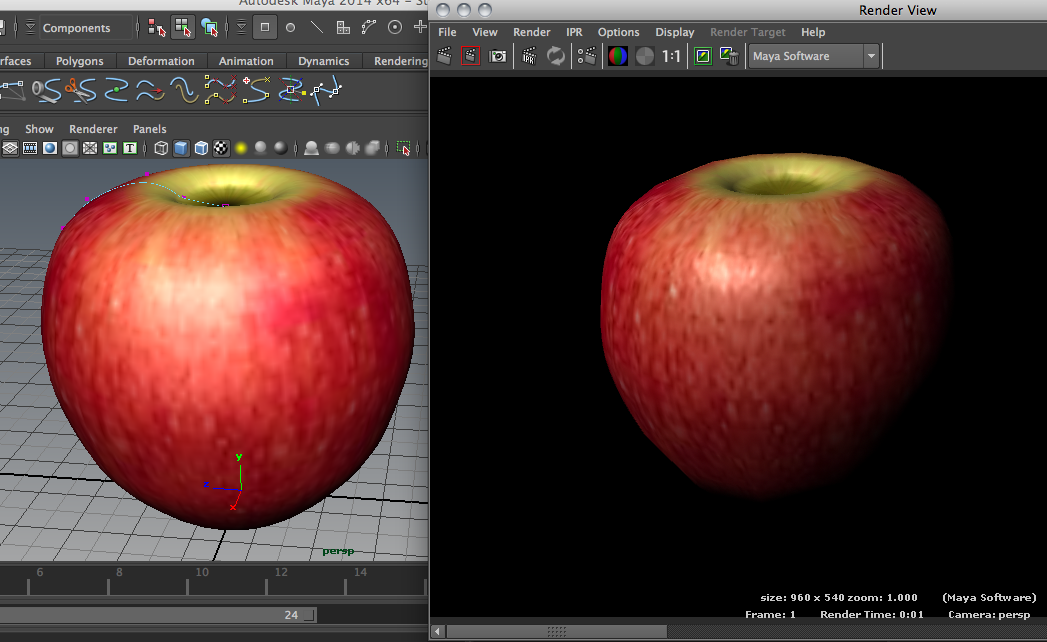
## Lab practice B: Apple shading
Applying a bitmap texture to more than two attributes (e.g. color / bump (normal))


_____________________________
## Lab practice C: Shading practices
Explore attributes, practice with different materials, and finally create a specific intended material.

Initial set up: pedestal, spheres, and lighting (one directional and one ambient)

You can duplicate or save shaders separately from the Hypershade.

___________________________________
More textures:


________________________
## Lab work to do
- Review & practice based on today's lecture & lab class material.
- Prepare your assignments.
## Assignment
- By Sunday Oct 23rd midnight, please complete your shading practices from today (three images: an eye, an apple, and multi shadings) and upload screenshots to the class Tumblr with simple descriptions of your shading, and caption: **"a06 by your name, date"** .
____________________________________